
分布式基础概念
微服务
基于业务边界进行服务微化拆分,各个服务器独立部署运行。
集群&分布式&节点
集群是个物理形态,分布式是个工作方式。
分布式是指将不同的业务分布在不同的地方,集群是指将几台服务器集中在一起实现同一业务。
分布式中的每个节点(集群中的一个服务器),都可以做集群,然而集群不一定就是分布式的。
远程调用
在分布式系统中,各个服务可能处于不同主机,但是服务之间不可避免的需要相互调用,即远程调用。
在spring-cloud中使用HTTP+JSON的方式完成远程调用。
负载均衡
在分布式系统中,A服务需要调用B服务,且B服务存在于多台机器中,A服务调用任意一个服务器均可完成功能。但是为了使得每一个服务器不要太忙或者太闲,可以使用负载均衡的调用每一个服务器。
常见的负载均衡算法如下:
- 轮询:按顺序,知道最后一个,然后循环。
- 最小连接:有限选择连接数最少(压力最小)的服务器。
- 散列:根据请求源的IP的散列(HASH)来选择要转发的服务器。
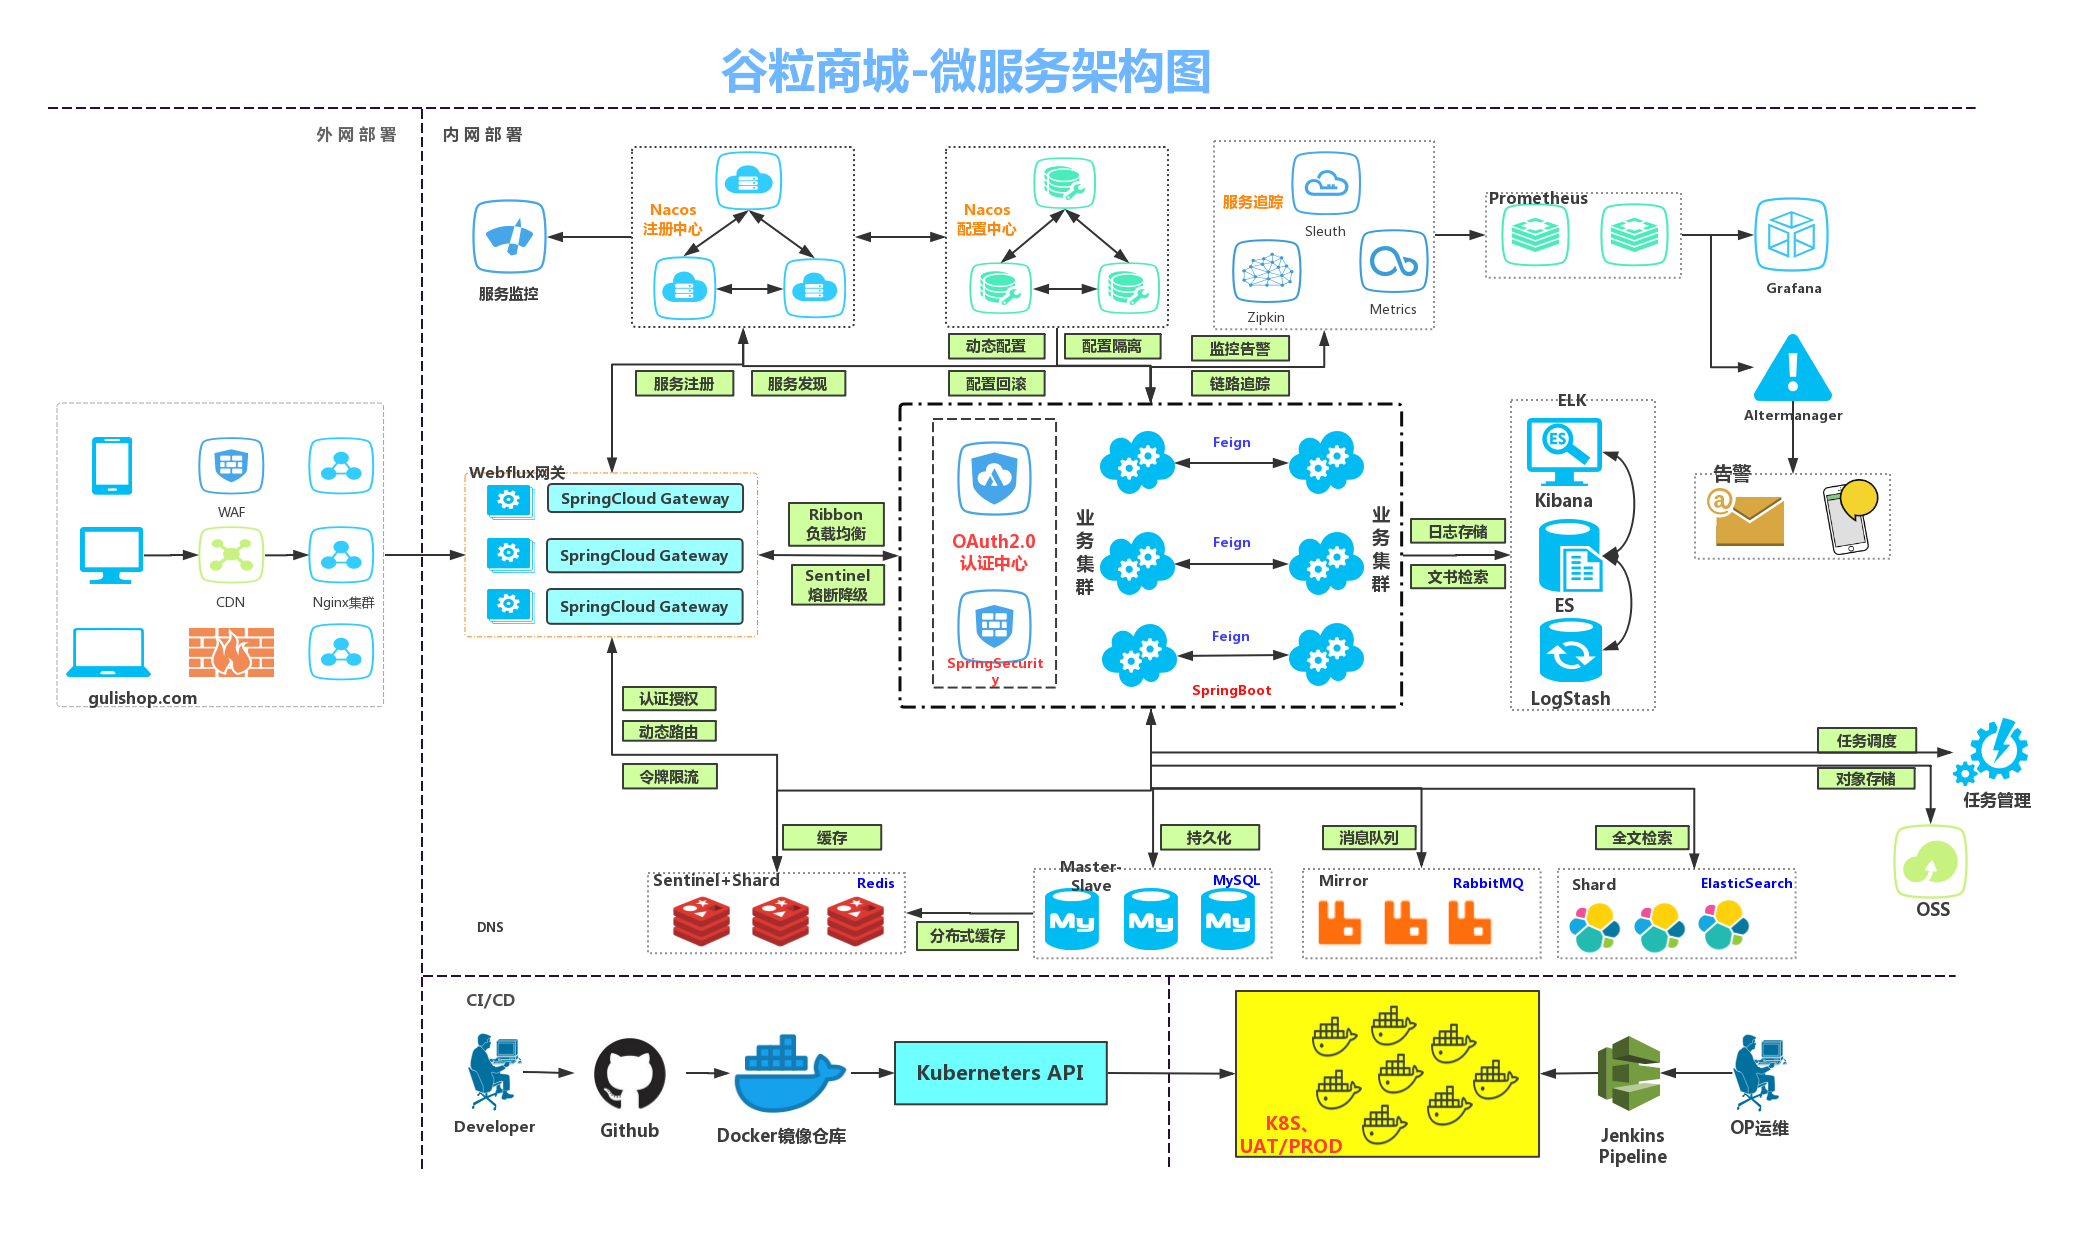
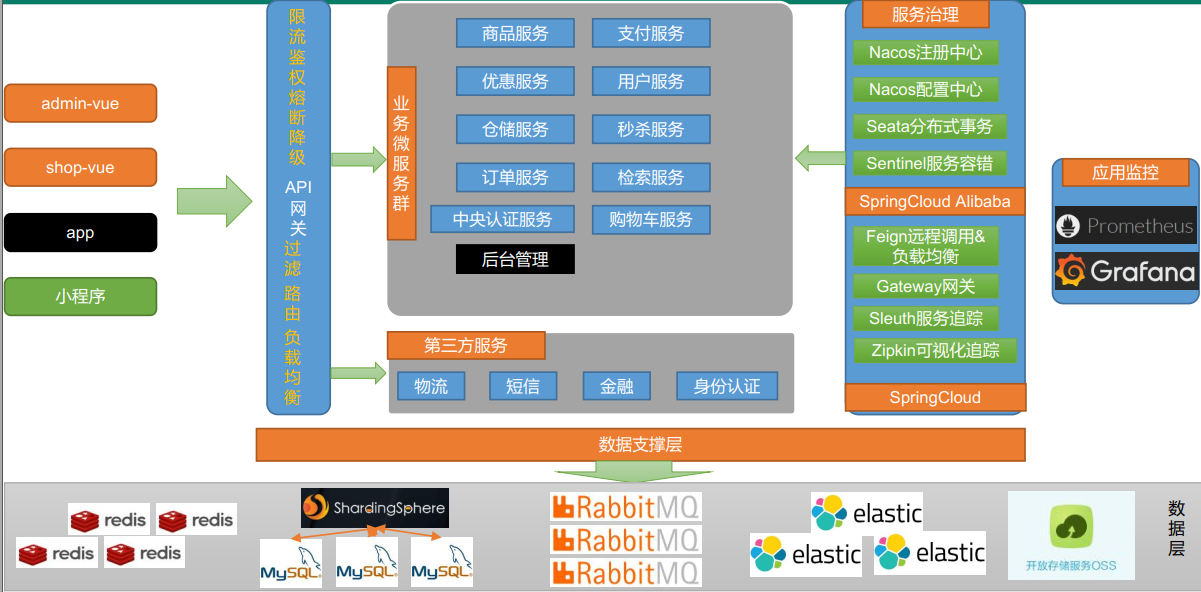
服务注册、发现&注册中心
服务上线后在注册中心注册,从而使得其他服务器或者人能够感知其存在与状态
配置中心
每一个服务器都含有大量的配置,并且每个服务可能部署在多台机器上,所以经常需要变更配置,就可以使用配置中心来集中管理微服务的配置信息。
服务熔断&服务降级
在微服务架构中,微服务之间通过网络进行通讯,当一个服务不可用的时候可能造成雪崩效应。为防止这样的情况,必须要有容错机制来保护服务。
服务熔断:设置服务的超时时间,当被调用的服务经常失败到达某个阈值,我们可以开启断路保护机制,使得后来的请求不再去调用这个服务,而是本地直接返回默认的数据。
服务降级:在运维期间,当系统处于高峰期,系统资源紧张,可以让非核心业务降级运行,即某些服务不处理或者简单处理。
API网关
抽象了微服务中都需要的公共功能,同时提供了客户端负载均衡、服务熔断、统一认证、限流流控、日志统计等功能。
微服务架构图
微服务划分图
Linux虚拟机环境搭建
之前的项目已经搭建的差不多了
相关命令
win:
- ipconfig
- ping 192.168.128.129
linux:
- ip addr
- ping 10.67.99.2
docker:
- 我的挂载文件地址都在mydata中
- docker images 当前所有镜像
- docker ps 当前正在运行的容器
- docker start xxx 启动容器
- docker exec -it mysql /bin/bash
- docker exec -it redis redis-cli
- whereis [容器名] 查看当前进入的容器文件的地址
- docker update redis –restart=always 自动重启容器
- exit
mysql:
- mysql -u root -p 访问mysql
redis:
- keys *
项目前后端基础搭建
后面回来得我表示,从一开始直接复制一样的版本号!!!
基础服务模块
注意每个服务模块,先导入web和openfeign
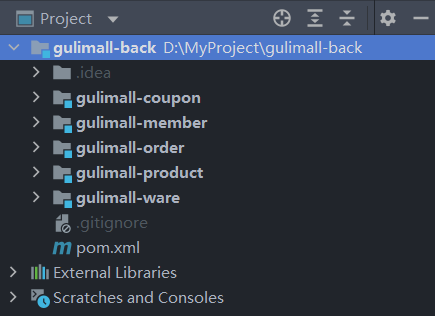
数据库
每个服务都需要独立的数据库
注意这里sql文件不要直接导入,可能导出的时候格式设置和现在不符合(创建的数据库字符编码为utf8mb4),直接导入会中文乱码,用记事本打开后再粘贴运行。
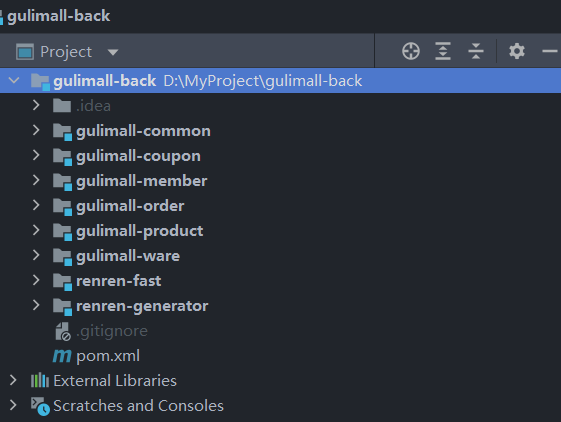
人人开源模板
renren-fast(后端)renren-fast-vue(前端)renren-generator(生成器)
renren-fast
- renren-fast clone后放到父模块中,记得在父模块的pom文件中写入model。
- 运行db文件夹中的对应sql
- 修改resources下的配置文件
- application-dev.yml中的druid数据源信息
renren-fast-vue
- clone后用vscode打开
- npm install(注意先把package.json中sass的版本改为4.14以上,因为npm的版本为14,两者版本有所对应,详见👉Vue解决报错9_人人开源renren-fast-vue执行npm install报错解决(sass的版本太低而node的版本太高导致)_xiaosi的博客-CSDN博客,奇怪的是package-lock.json中的版本为4.14.1,然而package中却是4.13.1)
- npm run dev,妈耶run了一下试试,就开了一个服务,内存已经85%了
- 可以在.eslintignore中添加
*.js和*.vue用于忽略语法检查
renren-generator
- clone,导入到后端项目中,记得在父模块的pom文件中写入model。
- 配置application.yml中的数据源配置(注意数据库名的编写)
- 配置generator.properties中的生成数据配置(注意模块名、表前缀即可)
- 运行application打开页面点击生成代码(如果一直在读取说明配置信息有误)
- 将压缩包中的main文件放入对应模块src文件夹
- 去renren-fast模块中的common文件夹中复制报错所需要的类
common模块
承接上文,反正就是修修补补
controller中的@RequiresPermissions注释可以通过修改generator的controller template(所以说为什么不能一开始就把模板修改了)
当前项目结构
整合mybatis-plus
依赖
由于common模块中已经导入了mybatis-plus依赖,所以需要使用只需要导入common模块即可
同时需要在common中导入mysql驱动
配置
配置datasource、mapper地址、mybatis-plus等,最好使用yml格式
application.yml
1 | # mysql |
classpath*表示不仅扫描本模块下的类路径,还包括引入的其他依赖的类路径
GulimallProductApplication
1 | // mapper包扫描 |
单元测试✅
1 | // 记得加,而且要引入Junit和springboot-starter-test依赖 |
前端调用api接口请求地址配置
注意去static->config->index.js中配置服务地址
1 | /** |
网关配置
写在application.yml中,千万注意缩进
解决renren-fase验证码
因为修改了端口号,但是renren-fast登录时候的验证码是在她本来的端口8080才能获取,所以需要让网关发现renren-fast
改变如localhost:88/api/captcha -> localhost:8080/renren-fast/captcha
- 先给renren-fast把nacos配好(注册中心和配置中心的都可以配)
- 编写网关配置如下
1 | spring: |
还要开启跨域
解决跨域
在网关当中写一个config类统一配置跨域,可
1 | package com.atguigu.gulimall.config; |

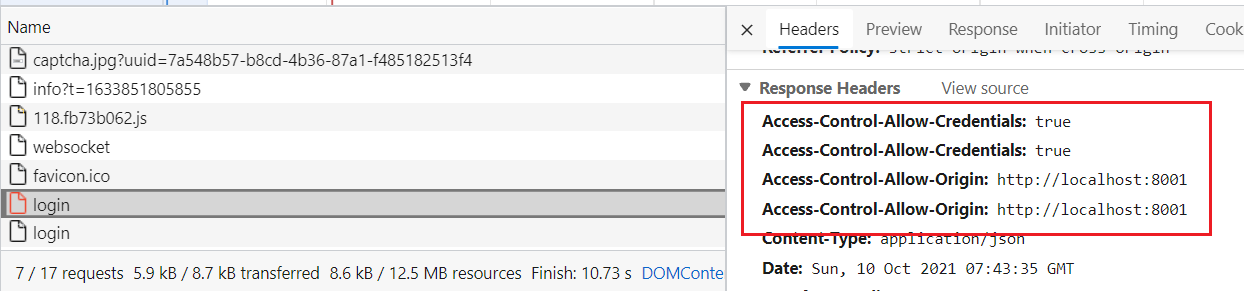
这里说明一下,一个login(methods为OPTION表示预见请求)已经通过了
第二是真实请求,携带了请求数据等
这里测试还是失败的原因是renren-fast自己已经配置过了跨域,两次跨域=没跨,把renren-fast的config文件夹下的CorsConfig注释掉即可
分布式组件
spring-cloud-alibaba
- nacos:注册中心配置中心
- Sentinel:服务容错(限流、降级、熔断)
- Seata:分布式事务解决方案
spring-cloud:
- Ribbon:负载均衡
- Feign:声明式HTTP客户端(远程服务)
- Gateway:API网关
- Sleuth:调用链监控
spring-cloud和spring-boot版本对应
https://start.spring.io/actuator/info
版本说明 · alibaba/spring-cloud-alibaba Wiki (github.com)
这个版本一定要对应起来
nacos注册中心
依赖
common模块即可
1 | <dependencies> |
配置nacos地址
注意需要使用的服务就需要在application中配置
1 | # mysql |
注解开启
1 | // mapper包扫描 |
可视化界面
Feign远程服务
依赖
1 | <dependency> |
服务接口
feign文件夹下写一个接口,在接口中提供声明需要被调用的服务的controller中的对应方法,并且把映射地址改为全地址,并且为接口添加@FeignClient注释,value为需要调用的服务的服务名。
注解开启
在调用服务的启动类上添加注解@EnableFeignClients(basepackages=”接口地址”)
(被调用的服务需要在开启nacos注册发现)
nacos配置中心
依赖
1 | <dependency> |
配置文件
在resources文件夹下的bootstrap.properties文件中配置Nacos Config元数据(一定得是bootstrap)
!!!一定要在bootstrap.properties中配置
1 | # 当前应用名 |
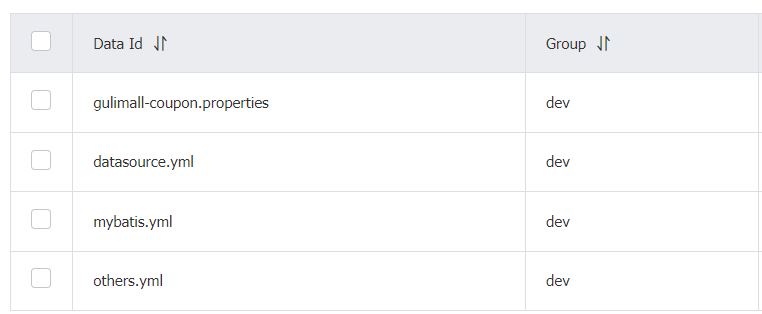
配置中心
在配置中心的配置列表中新建配置,DataID为
服务名.properties(如果是要加载application.properties的话),然后可以粘贴上配置内容注意这里测试了一下,还是把版本都和课件对应上比较好,要不然会有很多问题。
注解开启
在对应controller中@RefreshScope,当配置中心的配置值改变的时候,对应服务中的配置值也会改变
1 | // 开启配置中心动态获取配置 |
多配置集
1 | # nacos配置中心使用的命名空间(如果是自定义的填写对应id)和组 |
其他
- 命名空间:用于配置隔离,可以通过在bootstrap.properties配置文件修改从而修改对应内容
- 不同的生产环节下使用不同命名空间隔离
- 不同微服务之间隔离
- 配置集:所有的配置的集合
- 配置集ID:即nacos中的Data ID
- 配置分组:即nacos中的group,也可以隔离
Gateway网关
模块
创建Gateway模块,记得引入common,在父模块中添加model
启动类上加如下
2
@SpringBootApplication(exclude = {DataSourceAutoConfiguration.class})
依赖
1 | <dependency> |
配置文件
application.properties
1 | #nacos注册中心 |
网关配置
1 | spring: |
url为转发的地址,predicates断言为判断条件(详见官网),以上的意思为当uri中有一个key value对应url=baidu、url=qq,则进行跳转。
接口文档
1、分页请求参数 - 谷粒商城 - 易文档 (easydoc.net)
商品服务 - 三级分类(后台)
product模块,category相关
nacos配置
application.yml
1 | # mysql |
bootstrap.properties
1 | # 当前应用名 |
网关配置
这里坑很多,顺序,还有缩进,还有断言匹配还有转发的写法
1 | spring: |
递归树形结构查询所有分类(后端)
CategoryEntity
1 |
|
CategoryController
1 |
|
CategoryServiceImpl
1 |
|
上来就放了个大招,java8的新特性
显示所有分类(前端)
路由配置
启动renrenfast和renrenfase-vue
系统管理 -> 菜单管理 -> 添加目录和菜单(我的妈呀可视化操作这也太棒了吧)
路径中填写/会被替换成-,所以可以根据这个对应src->views->modules下的路径
即http://localhost:8001/#/product-category对应文件夹src->views->modules->product->category.vue
vue页面
renren-fast-vue\src\views\modules\product\category.vue
1 | <!-- 商品管理-分类维护 --> |
删除分类(后端)
逻辑删除
在application.yml中配置
1 | # mybatis |
在对应实体类的字段上添加注解@TableLogic
1 |
|
CategoryController
1 |
|
CategoryServiceImpl
1 |
|
删除分类(前端)
1 | <!-- 商品管理-分类维护 --> |
添加分类(后端)
已有
添加分类(前端)
1 | <!-- 商品管理-分类维护 --> |
修改分类(后端)
已有
修改分类(前端)
实现简单地信息修改,包括name,icon,productUnit
1 | <!-- 商品管理-分类维护 --> |
拖拽修改分类(后端)
1 | /** |
拖拽修改分类(前端)
el-tree 开启draggable即可,allow-drop判断
这一part值得重复观看
1 | <!-- 商品管理-分类维护 --> |
TODO : 当前bug,如果层级3的菜单拖拽到层级2后失踪,应该和pcid有关(拖拽至层级1有效)
层级2无子节点拖拽到层级2后失踪(不过看起来后台数据库没问题呀?)
TODO:这个bug被后来的批量保存改正了,反正都批量保存了,也有问题了
批量删除分类(前端)

1 | <div> |