统计分析后台(后端+前端)
环境搭建
老样子
生成统计数据(后端)
注意,要查询什么数据要在对应模块中查询,然后在统计模块远程调用获取
被调用方controller
1
2
3
4
5
6
7
8
9
10
11
12
13
| @RestController
@RequestMapping("/educenter/member")
@CrossOrigin
public class UcenterMemberController {
@Autowired
private UcenterMemberService memberService;
@GetMapping("countRegister/{day}")
public Integer countRegister(@PathVariable String day) {
Integer count = memberService.countRegister(day);
return count;
}
}
|
被调用方service
1
2
3
4
5
|
@Override
public Integer countRegister(String day) {
return baseMapper.countRegisterByDay(day);
}
|
被调用方mapper
1
2
3
4
5
6
7
8
9
10
| <?xml version="1.0" encoding="UTF-8"?>
<!DOCTYPE mapper PUBLIC "-//mybatis.org//DTD Mapper 3.0//EN" "http://mybatis.org/dtd/mybatis-3-mapper.dtd">
<mapper namespace="com.atguigu.educenter.mapper.UcenterMemberMapper">
<select id="countRegisterByDay" resultType="java.lang.Integer">
SELECT COUNT(*)
FROM ucenter_member uc
WHERE DATE(uc.gmt_create) = #{day}
</select>
</mapper>
|
远程调用接口
1
2
3
4
5
6
7
| @Component
@FeignClient("service-ucenter")
public interface UcenterClient {
@GetMapping("/educenter/member/countRegister/{day}")
public Integer countRegister(@PathVariable("day") String day);
}
|
调用方controller
1
2
3
4
5
6
7
8
9
10
11
12
13
14
15
| @RestController
@RequestMapping("/staservice/sta")
@CrossOrigin
public class StatisticsDailyController {
@Autowired
private StatisticsDailyService staService;
@PostMapping("countRegister/{day}")
public R countRegister(@PathVariable String day) {
staService.countRegister(day);
return R.ok();
}
}
|
调用方service
1
2
3
4
5
6
7
8
9
10
11
12
13
14
15
16
17
18
19
20
21
22
23
24
25
26
| @Service
public class StatisticsDailyServiceImpl extends ServiceImpl<StatisticsDailyMapper, StatisticsDaily> implements StatisticsDailyService {
@Autowired
private UcenterClient ucenterClient;
@Override
public void countRegister(String day) {
QueryWrapper<StatisticsDaily> wrapper = new QueryWrapper<>();
wrapper.eq("date_calculated", day);
baseMapper.delete(wrapper);
Integer count = ucenterClient.countRegister(day);
StatisticsDaily statisticsDaily = new StatisticsDaily();
statisticsDaily.setRegisterNum(count);
statisticsDaily.setDateCalculated(day);
statisticsDaily.setVideoViewNum(RandomUtils.nextInt(100, 200));
statisticsDaily.setLoginNum(RandomUtils.nextInt(100, 200));
statisticsDaily.setCourseNum(RandomUtils.nextInt(100, 200));
baseMapper.insert(statisticsDaily);
}
}
|
生成统计数据(前端)
router
1
2
3
4
5
6
7
8
9
10
11
12
13
14
15
16
17
18
19
20
21
22
|
{
path: '/sta',
component: Layout,
redirect: '/sta/create',
name: '统计分析',
meta: { title: '统计分析', icon: 'example' },
children: [
{
path: 'create',
name: '生成数据',
component: () => import('@/views/statistics/create'),
meta: { title: '生成数据', icon: 'table' }
},
{
path: 'show',
name: '图表显示',
component: () => import('@/views/statistics/show'),
meta: { title: '图表显示', icon: 'tree' }
}
]
},
|
api
1
2
3
4
5
6
7
8
9
10
11
| import request from '@/utils/request'
export default {
createCountRegister(day) {
return request({
url: `/staservice/sta/countRegister/${day}`,
method: 'post'
})
}
}
|
vue模板与方法
1
| <template> <div class="app-container"> <!--表单--> <el-form :inline="true" class="demo-form-inline"> <el-form-item label="日期"> <!-- 这里绑定了day --> <el-date-picker v-model="day" type="date" placeholder="选择要统计的日期" value-format="yyyy-MM-dd" /> </el-form-item> <el-button :disabled="btnDisabled" type="primary" @click="create()" >生成</el-button > </el-form> </div></template><script> import staApi from '@/api/statistics' export default { data() { return { day: '', btnDisabled: false } }, created() {}, methods: { create() { staApi.createCountRegister(this.day).then(result => { // 提示信息 this.$message({ type: 'success', message: '生成数据成功!' }) // 跳转到图表显示页面 this.$router.push({ path: '/sta/show' }) }) } } }</script>
|
定时任务
在固定时候自动执行程序
配置
在启动类上添加注解@EnableScheduling
定时任务类
使用cron表达式,设置执行规则
1
| @Componentpublic class ScheduledTask { @Autowired private StatisticsDailyService staService;
|
日期工具类
1
| public class DateUtil { private static final String dateFormat = "yyyy-MM-dd"; public static String formatDate(Date date) { SimpleDateFormat sdf = new SimpleDateFormat(dateFormat); return sdf.format(date); } public static Date addDays(Date date, int amount) { Calendar now =Calendar.getInstance(); now.setTime(date); now.set(Calendar.DATE,now.get(Calendar.DATE)+amount); return now.getTime(); } public static void main(String[] args) { System.out.println(DateUtil.formatDate(new Date())); System.out.println(DateUtil.formatDate(DateUtil.addDays(new Date(), -1))); }}
|
统计分析图表显示(后端+前端)
使用echarts
后端
controller
service
前端
引入npm依赖
npm install –save echarts@4.1.0
api
这里没有使用RequestBody传递对象,而是直接前端调用的时候传递对象取对应值
vue模板和方法
1
| <template> <div class="app-container"> <!--表单--> <el-form :inline="true" class="demo-form-inline"> <el-form-item> <el-select v-model="searchObj.type" clearable placeholder="请选择"> <el-option label="学员登录数统计" value="login_num" /> <el-option label="学员注册数统计" value="register_num" /> <el-option label="课程播放数统计" value="video_view_num" /> <el-option label="每日课程数统计" value="course_num" /> </el-select> </el-form-item> <el-form-item> <el-date-picker v-model="searchObj.begin" type="date" placeholder="选择开始日期" value-format="yyyy-MM-dd" /> </el-form-item> <el-form-item> <el-date-picker v-model="searchObj.end" type="date" placeholder="选择截止日期" value-format="yyyy-MM-dd" /> </el-form-item> <el-button :disabled="btnDisabled" type="primary" icon="el-icon-search" @click="showChart()" >查询</el-button > </el-form> <div class="chart-container"> <div id="chart" class="chart" style="height: 500px; width: 100%" /> </div> </div></template><script> import echarts from 'echarts' import staApi from '@/api/statistics' export default { data() { return { searchObj: {}, btnDisabled: false, xData: [], yData: [] } }, methods: { showChart() { staApi.getChartData(this.searchObj).then(result => { this.yData = result.data.numList this.xData = result.data.dateList // 调用下面生成图表的方法,改变值 this.setChart() }) }, // 默认显示图表方法 setChart() { // 基于准备好的dom,初始化echarts实例 this.chart = echarts.init(document.getElementById('chart')) // console.log(this.chart) // 指定图表的配置项和数据 var option = { title: { text: '数据统计' }, tooltip: { trigger: 'axis' }, dataZoom: [ { show: true, height: 30, xAxisIndex: [0], bottom: 30, start: 10, end: 80, handleIcon: 'path://M306.1,413c0,2.2-1.8,4-4,4h-59.8c-2.2,0-4-1.8-4-4V200.8c0-2.2,1.8-4,4-4h59.8c2.2,0,4,1.8,4,4V413z', handleSize: '110%', handleStyle: { color: '#d3dee5' }, textStyle: { color: '#fff' }, borderColor: '#90979c' }, { type: 'inside', show: true, height: 15, start: 1, end: 35 } ], // x轴是类目轴(离散数据),必须通过data设置类目数据 xAxis: { type: 'category', data: this.xData }, // y轴是数据轴(连续数据) yAxis: { type: 'value' }, // 系列列表。每个系列通过 type 决定自己的图表类型 series: [ { // 系列中的数据内容数组 data: this.yData, // 折线图 type: 'line' } ] } this.chart.setOption(option) } } }</script>
|
Canal数据同步
将远程数据库中的数据同步到本地数据库中,一般实际中项目有很多个数据库(比如说统计分析专门一个数据库),其与远程服务调用调用的区别是,该同步耦合度低,效率更高。
linux配置与开启
- linux中需要安装mysql(本地Windows也需要mysql)
- 创建数据库表(结构需要一样)
linux中docker中使用mysql一些常见命令
- su root
- docker ps
- docker start mysql
- docker exec -it mysql bash
- mysql -u root -p
- 可以使用命令行,也可以直接用配好的Navicat(实战5中配置redis的时候已经配置好了mysql)
- exit
- docker stop CONTAINER ID
创建数据库表
数据库guli,表test_canal
注意结构需要一样
mysql开启binlog
- 开启并进入mysql
- show variables like ‘log_bin’; 查询是否开启binlog
- 修改my.cnf(如果使用docker,那么要去挂载的目录下修改),具体如下篇文章
- https://www.freebytes.net/it/java/dokcer-mysql-binlog.htmlz
这里花了大概半个小时吧,还是个人博客文章靠谱,那些CSDN的文章都是炒来炒去的,这篇文章很清楚地讲了你挂载的目录是前半部分(我看CSDN那些文章总以为是配置挂载的时候的后半部分,所以弄了好久都没有用,看了这篇文章几分钟就解决了)
安装并配置canal
linux中下载然后解压
具体配置见视频
开启canal即可,进入bin文件夹下sh startup.sh
客户端代码编写
创建模块
引入依赖
1
2
3
4
5
6
7
8
9
10
11
12
13
14
15
16
17
18
19
20
21
22
23
24
25
26
27
| <dependencies>
<dependency>
<groupId>org.springframework.boot</groupId>
<artifactId>spring-boot-starter-web</artifactId>
</dependency>
<dependency>
<groupId>mysql</groupId>
<artifactId>mysql-connector-java</artifactId>
</dependency>
<dependency>
<groupId>commons-dbutils</groupId>
<artifactId>commons-dbutils</artifactId>
</dependency>
<dependency>
<groupId>org.springframework.boot</groupId>
<artifactId>spring-boot-starter-jdbc</artifactId>
</dependency>
<dependency>
<groupId>com.alibaba.otter</groupId>
<artifactId>canal.client</artifactId>
</dependency>
</dependencies>
|
配置文件
1
2
3
4
5
6
7
8
9
10
11
12
13
|
server.port=10000
spring.application.name=canal-client
spring.profiles.active=dev
spring.datasource.driver-class-name=com.mysql.cj.jdbc.Driver
spring.datasource.url=jdbc:mysql://localhost:3306/guli?serverTimezone=GMT%2B8
spring.datasource.username=root
spring.datasource.password=123456789
|
canal客户端类
1
2
3
4
5
6
7
8
9
10
11
12
13
14
15
16
17
18
19
20
21
22
23
24
25
26
27
28
29
30
31
32
33
34
35
36
37
38
39
40
41
42
43
44
45
46
47
48
49
50
51
52
53
54
55
56
57
58
59
60
61
62
63
64
65
66
67
68
69
70
71
72
73
74
75
76
77
78
79
80
81
82
83
84
85
86
87
88
89
90
91
92
93
94
95
96
97
98
99
100
101
102
103
104
105
106
107
108
109
110
111
112
113
114
115
116
117
118
119
120
121
122
123
124
125
126
127
128
129
130
131
132
133
134
135
136
137
138
139
140
141
142
143
144
145
146
147
148
149
150
151
152
153
154
155
156
157
158
159
160
161
162
163
164
165
166
167
168
169
170
171
172
173
174
175
176
177
178
179
180
181
182
183
184
185
186
187
188
189
190
191
192
193
194
195
196
197
| @Component
public class CanalClient {
private Queue<String> SQL_QUEUE = new ConcurrentLinkedQueue<>();
@Resource
private DataSource dataSource;
public void run() {
CanalConnector connector = CanalConnectors.newSingleConnector(new InetSocketAddress("192.168.128.129",
11111), "example", "", "");
int batchSize = 1000;
try {
connector.connect();
connector.subscribe(".*\\..*");
connector.rollback();
try {
while (true) {
Message message = connector.getWithoutAck(batchSize);
long batchId = message.getId();
int size = message.getEntries().size();
if (batchId == -1 || size == 0) {
Thread.sleep(1000);
} else {
dataHandle(message.getEntries());
}
connector.ack(batchId);
if (SQL_QUEUE.size() >= 1) {
executeQueueSql();
}
}
} catch (InterruptedException e) {
e.printStackTrace();
} catch (InvalidProtocolBufferException e) {
e.printStackTrace();
}
} finally {
connector.disconnect();
}
}
public void executeQueueSql() {
int size = SQL_QUEUE.size();
for (int i = 0; i < size; i++) {
String sql = SQL_QUEUE.poll();
System.out.println("[sql]----> " + sql);
this.execute(sql.toString());
}
}
private void dataHandle(List<Entry> entrys) throws InvalidProtocolBufferException {
for (Entry entry : entrys) {
if (EntryType.ROWDATA == entry.getEntryType()) {
RowChange rowChange = RowChange.parseFrom(entry.getStoreValue());
EventType eventType = rowChange.getEventType();
if (eventType == EventType.DELETE) {
saveDeleteSql(entry);
} else if (eventType == EventType.UPDATE) {
saveUpdateSql(entry);
} else if (eventType == EventType.INSERT) {
saveInsertSql(entry);
}
}
}
}
private void saveUpdateSql(Entry entry) {
try {
RowChange rowChange = RowChange.parseFrom(entry.getStoreValue());
List<RowData> rowDatasList = rowChange.getRowDatasList();
for (RowData rowData : rowDatasList) {
List<Column> newColumnList = rowData.getAfterColumnsList();
StringBuffer sql = new StringBuffer("update " + entry.getHeader().getTableName() + " set ");
for (int i = 0; i < newColumnList.size(); i++) {
sql.append(" " + newColumnList.get(i).getName()
+ " = '" + newColumnList.get(i).getValue() + "'");
if (i != newColumnList.size() - 1) {
sql.append(",");
}
}
sql.append(" where ");
List<Column> oldColumnList = rowData.getBeforeColumnsList();
for (Column column : oldColumnList) {
if (column.getIsKey()) {
sql.append(column.getName() + "=" + column.getValue());
break;
}
}
SQL_QUEUE.add(sql.toString());
}
} catch (InvalidProtocolBufferException e) {
e.printStackTrace();
}
}
private void saveDeleteSql(Entry entry) {
try {
RowChange rowChange = RowChange.parseFrom(entry.getStoreValue());
List<RowData> rowDatasList = rowChange.getRowDatasList();
for (RowData rowData : rowDatasList) {
List<Column> columnList = rowData.getBeforeColumnsList();
StringBuffer sql = new StringBuffer("delete from " + entry.getHeader().getTableName() + " where ");
for (Column column : columnList) {
if (column.getIsKey()) {
sql.append(column.getName() + "=" + column.getValue());
break;
}
}
SQL_QUEUE.add(sql.toString());
}
} catch (InvalidProtocolBufferException e) {
e.printStackTrace();
}
}
private void saveInsertSql(Entry entry) {
try {
RowChange rowChange = RowChange.parseFrom(entry.getStoreValue());
List<RowData> rowDatasList = rowChange.getRowDatasList();
for (RowData rowData : rowDatasList) {
List<Column> columnList = rowData.getAfterColumnsList();
StringBuffer sql = new StringBuffer("insert into " + entry.getHeader().getTableName() + " (");
for (int i = 0; i < columnList.size(); i++) {
sql.append(columnList.get(i).getName());
if (i != columnList.size() - 1) {
sql.append(",");
}
}
sql.append(") VALUES (");
for (int i = 0; i < columnList.size(); i++) {
sql.append("'" + columnList.get(i).getValue() + "'");
if (i != columnList.size() - 1) {
sql.append(",");
}
}
sql.append(")");
SQL_QUEUE.add(sql.toString());
}
} catch (InvalidProtocolBufferException e) {
e.printStackTrace();
}
}
public void execute(String sql) {
Connection con = null;
try {
if (null == sql) return;
con = dataSource.getConnection();
QueryRunner qr = new QueryRunner();
int row = qr.execute(con, sql);
System.out.println("update: " + row);
} catch (SQLException e) {
e.printStackTrace();
} finally {
DbUtils.closeQuietly(con);
}
}
}
|
启动类
1
2
3
4
5
6
7
8
9
10
11
12
13
14
15
| @SpringBootApplication
public class CanalApplication implements CommandLineRunner {
@Resource
private CanalClient canalClient;
public static void main(String[] args) {
SpringApplication.run(CanalApplication.class, args);
}
@Override
public void run(String... strings) throws Exception {
canalClient.run();
}
}
|
测试
TODO,这里application启动失败,去canal的log里看,说连接mysql的ip失败了,原因是address already in use,
然后我改了重启还是这个原因,本来没有被占用的端口启动了之后就被占用了,但是canal还是启动失败,就离谱,
总之原因是canal没有启动,address already in use
还是没解决,放弃了(我不理解!!!)
SpringCloud微服务
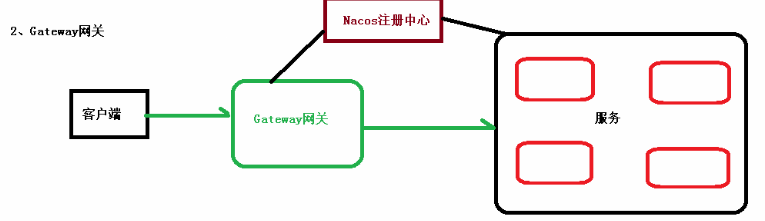
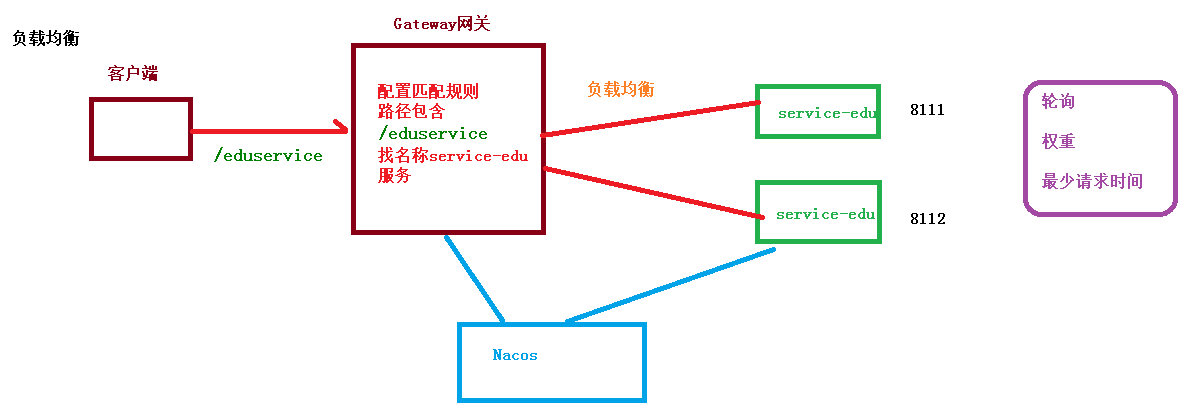
Gateway网关
概念
微服务架构之下不同的微服务有不同的网络地址,外部客户端需要调用多个服务的接口才能完成一个业务需求,但是如果直接让客户端与各个服务器通信,会出现许多问题,所以这些问题需要借助API网关解决。
网关是结余客户端和服务端之间的之间层,所有外部请求都会先经过API网关这一层,所以网关实现安全,性能,监控等操作。
就是之前的nginx的增强版
创建模块
创建模块infrastructure,子模块api_gateway
依赖
1
2
3
4
5
6
7
8
9
10
11
12
13
14
15
16
17
18
19
20
21
22
23
24
25
| <dependencies>
<dependency>
<groupId>com.atguigu</groupId>
<artifactId>common_utils</artifactId>
<version>0.0.1-SNAPSHOT</version>
</dependency>
<dependency>
<groupId>org.springframework.cloud</groupId>
<artifactId>spring-cloud-starter-alibaba-nacos-discovery</artifactId>
</dependency>
<dependency>
<groupId>org.springframework.cloud</groupId>
<artifactId>spring-cloud-starter-gateway</artifactId>
</dependency>
<dependency>
<groupId>com.google.code.gson</groupId>
<artifactId>gson</artifactId>
</dependency>
<dependency>
<groupId>org.springframework.cloud</groupId>
<artifactId>spring-cloud-starter-openfeign</artifactId>
</dependency>
</dependencies>
|
配置文件
配置服务按如下配置即可
也可以使用YAML格式,更方便不用写下标
1
2
3
4
5
6
7
8
9
10
11
12
13
14
15
16
17
18
19
20
21
22
|
server.port=8222
spring.application.name=service-gateway
spring.cloud.nacos.discovery.server-addr=127.0.0.1:8848
spring.cloud.gateway.discovery.locator.enabled=true
spring.cloud.gateway.routes[0].id=service-acl
spring.cloud.gateway.routes[0].uri=lb://service-acl
spring.cloud.gateway.routes[0].predicates=Path=/*/acl/**
spring.cloud.gateway.routes[1].id=service-edu
spring.cloud.gateway.routes[1].uri=lb://service-edu
spring.cloud.gateway.routes[1].predicates=Path=/eduservice/**
spring.cloud.gateway.routes[2].id=service-msm
spring.cloud.gateway.routes[2].uri=lb://service-msm
spring.cloud.gateway.routes[2].predicates=Path=/edumsm/**
|
启动类
1
2
3
4
5
6
7
| @SpringBootApplication
@EnableDiscoveryClient
public class GatewayApplication {
public static void main(String[] args) {
SpringApplication.run(GatewayApplication.class, args);
}
}
|
测试:使用网关的端口号即可访问已配置的微服务OK
跨域问题
在网关中统一开启跨域,cv一下固定config、filter、handler
注意controller中的跨域注解不能有,要不然两次跨域抵消
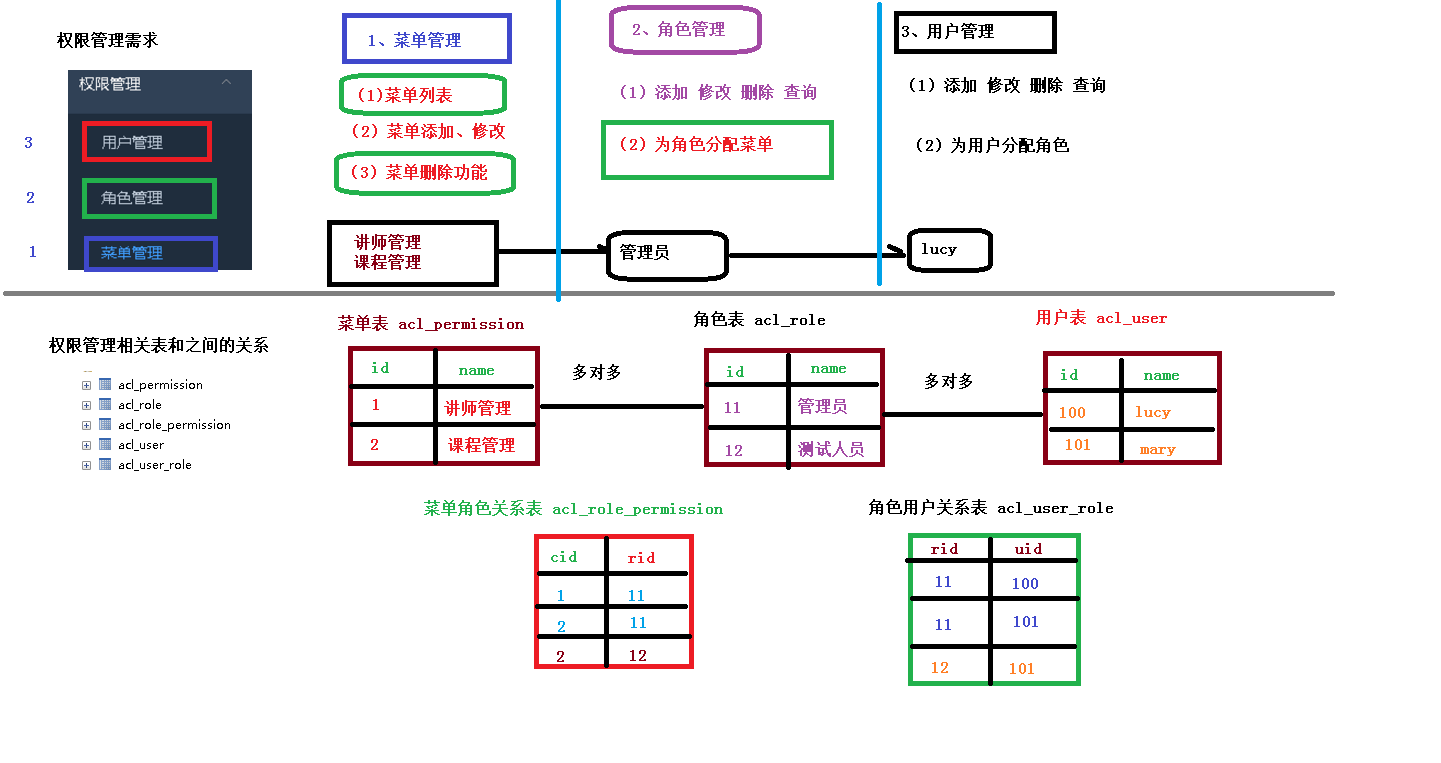
权限管理(后端)
环境搭建
模块
service_acl,spring_security
依赖
1
2
3
4
5
6
7
8
9
10
11
| <dependencies>
<dependency>
<groupId>com.atguigu</groupId>
<artifactId>spring_security</artifactId>
<version>0.0.1-SNAPSHOT</version>
</dependency>
<dependency>
<groupId>com.alibaba</groupId>
<artifactId>fastjson</artifactId>
</dependency>
</dependencies>
|
整合接口
直接CV好家伙,好像是因为太复杂了吧,没事下个项目自己做
获取所有菜单
递归,构建树形结构(注意菜单可能有多级结构(之前做过两级的))
entity
注意这个实体类的属性,使用了递归存储children
1
2
3
4
5
6
7
8
9
10
11
12
13
14
15
16
17
18
19
20
| public class Permission implements Serializable {
private static final long serialVersionUID = 1L;
@ApiModelProperty(value = "编号")
@TableId(value = "id", type = IdType.ID_WORKER_STR)
private String id;
@ApiModelProperty(value = "所属上级")
private String pid;
@ApiModelProperty(value = "层级")
@TableField(exist = false)
private Integer level;
@ApiModelProperty(value = "下级")
@TableField(exist = false)
private List<Permission> children;
}
|
controller
1
2
3
4
5
6
7
8
9
10
11
12
13
| @RestController
@RequestMapping("/admin/acl/permission")
public class PermissionController {
@Autowired
private PermissionService permissionService;
@ApiOperation(value = "查询所有菜单")
@GetMapping
public R indexAllPermission() {
List<Permission> list = permissionService.queryAllMenuGuli();
return R.ok().data("children",list);
}
}
|
service
1
2
3
4
5
6
7
8
9
10
11
12
13
14
15
16
17
18
19
20
21
22
23
24
25
26
27
28
29
30
31
32
33
34
35
36
37
38
39
40
41
42
43
44
45
46
47
48
49
|
@Override
public List<Permission> queryAllMenuGuli() {
QueryWrapper<Permission> wrapper = new QueryWrapper<>();
wrapper.orderByDesc("id");
List<Permission> permissionList = baseMapper.selectList(wrapper);
List<Permission> resultList = bulidPermission(permissionList);
return resultList;
}
public static List<Permission> bulidPermission(List<Permission> permissionList) {
List<Permission> finalNode = new ArrayList<>();
for(Permission permissionNode : permissionList) {
if("0".equals(permissionNode.getPid())) {
permissionNode.setLevel(1);
finalNode.add(selectChildren(permissionNode,permissionList));
}
}
return finalNode;
}
private static Permission selectChildren(Permission permissionNode, List<Permission> permissionList) {
permissionNode.setChildren(new ArrayList<Permission>());
for(Permission it : permissionList) {
if(permissionNode.getId().equals(it.getPid())) {
int level = permissionNode.getLevel()+1;
it.setLevel(level);
permissionNode.getChildren().add(selectChildren(it,permissionList));
}
}
return permissionNode;
}
|
测试
SwaggerConfig类中有一行代码需要注释才能测试,,表示路径中有这个关键字则不让测试,可以注释掉这行代码也可以修改controller的路径
1
2
3
4
5
6
7
8
9
10
11
| @Bean
public Docket webApiConfig() {
return new Docket(DocumentationType.SWAGGER_2)
.groupName("webApi")
.apiInfo(webApiInfo())
.select()
.paths(Predicates.not(PathSelectors.regex("/error.*")))
.build();
}
|
删除菜单
递归删除,删除上级菜单下级菜单也要同时删除
controller
1
2
3
4
5
6
| @ApiOperation(value = "递归删除菜单")
@DeleteMapping("remove/{id}")
public R remove(@PathVariable String id) {
permissionService.removeChildByIdGuli(id);
return R.ok();
}
|
service
1
2
3
4
5
6
7
8
9
10
11
12
13
14
15
16
17
18
19
20
21
22
23
24
25
26
27
|
@Override
public void removeChildByIdGuli(String id) {
List<String> idList = new ArrayList<>();
this.selectPermissionChildById(id, idList);
idList.add(id);
baseMapper.deleteBatchIds(idList);
}
private void selectPermissionChildById(String id, List<String> idList) {
QueryWrapper<Permission> wrapper = new QueryWrapper<>();
wrapper.eq("pid", id);
wrapper.select("id");
List<Permission> childIdList = baseMapper.selectList(wrapper);
childIdList.stream().forEach(item -> {
idList.add(item.getId());
this.selectPermissionChildById(item.getId(), idList);
});
}
|
角色分配权限
controller
1
2
3
4
5
6
| @ApiOperation(value = "给角色分配权限")
@PostMapping("/doAssign")
public R doAssign(String roleId,String[] permissionId) {
permissionService.saveRolePermissionRealtionShipGuli(roleId,permissionId);
return R.ok();
}
|
service
1
2
3
4
5
6
7
8
9
10
11
12
13
14
15
16
17
18
19
|
@Override
public void saveRolePermissionRealtionShipGuli(String roleId, String[] permissionIds) {
List<RolePermission> rolePermissionList = new ArrayList<>();
for (String perId : permissionIds) {
RolePermission rolePermission = new RolePermission();
rolePermission.setRoleId(roleId);
rolePermission.setPermissionId(perId);
rolePermissionList.add(rolePermission);
}
rolePermissionService.saveBatch(rolePermissionList);
}
|
SpringSecurity
介绍
spring-security实现功能如下:
- 用户认证:用户登录时查询数据库验证用户名和密码
- 用户授权:登录之后给予用户对应的权限和操作功能
spring-security本质上是filter,对请求进行过滤:
- 基于session,则对cookie中的sessionid进行解析找到服务器存储的session信息然后判断当前用户是否符合请求的要求
- 基于token,则解析出token然后将当前请求加入到spring-security管理的权限信息当中
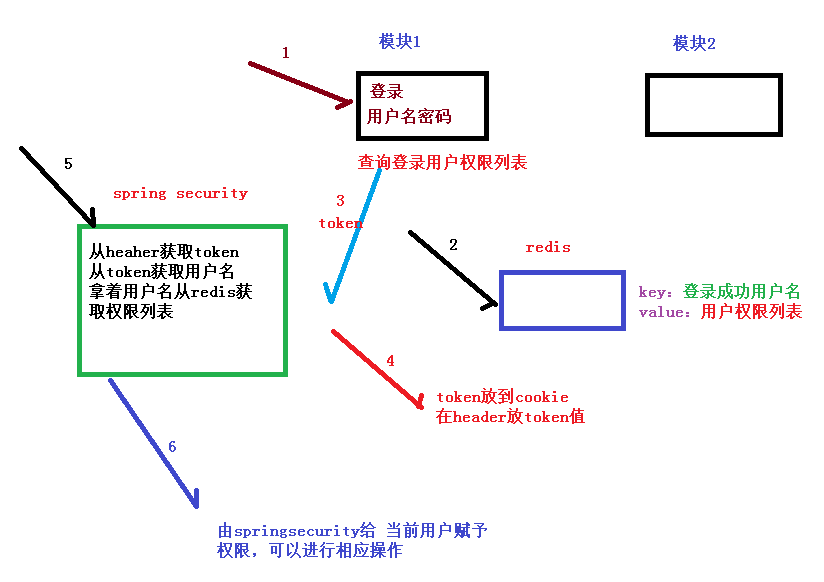
认证和授权实现思路
如果系统的模块众多,每个模块都需要就行授权与认证,所以我们选择基于token的形式进行授权与认证,用户根据用户名密码认证成功,然后获取当前用户角色的一系列权限值,并以用户名为key,权限列表为value的形式存入redis缓存中,根据用户名相关信息生成token返回,浏览器将token记录到cookie中,每次调用api接口都默认将token携带到header请求头中,Spring-security解析header头获取token信息,解析token获取当前用户名,根据用户名就可以从redis中获取权限列表,这样Spring-security就能够判断当前请求是否有权限访问
整合
依赖
1
2
3
4
5
6
7
8
9
10
11
12
13
14
15
16
17
| <dependencies>
<dependency>
<groupId>com.atguigu</groupId>
<artifactId>common_utils</artifactId>
<version>0.0.1-SNAPSHOT</version>
</dependency>
<dependency>
<groupId>org.springframework.boot</groupId>
<artifactId>spring-boot-starter-security</artifactId>
</dependency>
<dependency>
<groupId>io.jsonwebtoken</groupId>
<artifactId>jjwt</artifactId>
</dependency>
</dependencies>
|
项目结构
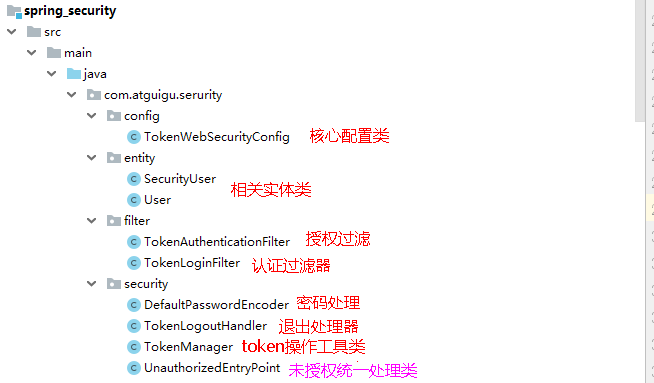
测试
妈耶太吓人了幸好我备份了(为啥git不先讲),试了下整合,菜单栏还是显示不出来,先恢复了,以后再试
Nacos配置管理
Git版本管理
创建本地git仓库:idea -> VCS -> Create Git Repository
将文件加到本地仓库:idea -> 父项目名 -> 右键 -> git -> add
添加远程仓库地址:idea -> 父项目名 -> 右键 -> git -> git remotes
将文件提交至远程仓库:commit
上传:push
