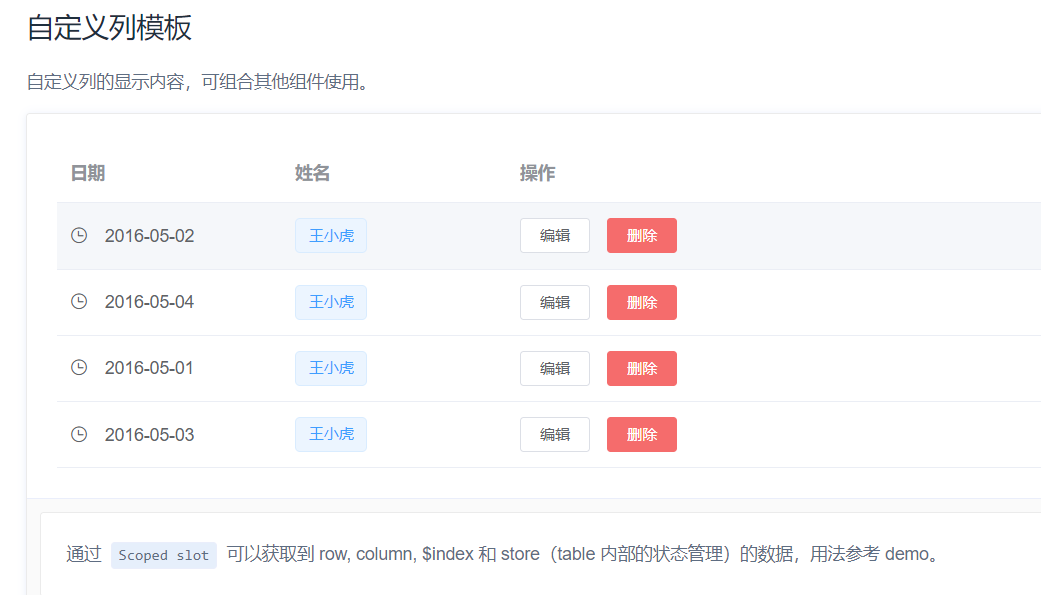
品牌管理(后台)
商品系统下的品牌管理,数据库表对应product-brand
使用逆向工程
先使用人人快速开发平台,系统管理—>菜单管理—>添加菜单
使用renren-generator逆向生成工程(之前已经做过了)
复制粘贴其中resource下的modules文件夹下的视图模板(我qiao这么棒的吗)
视图模板这里可以先把权限管理删除(v-if=”isAuth”),或者去index.js中的isAuth方法返回TRUE
增删改查都写好了(还可以这样我qiao)
关闭语法检查
build -> webpack.base.conf.js -> createLintingRule方法中注释即可
?我发现我注释掉之后会报错,所以还是用我之前那个方法
优化列显示开关按钮 element-ui组件
按钮事件
绑定change事件
注意showStatus在数据库中是int类型,所以需要判断转换一下(但是直接把Switch的active-value换成10就不用再转换了)
1
2
3
4
5
6
7
8
9
10
11
12
13
14
15
16
17
18
<el-table-column prop="showStatus" header-align="center" align="center" label="显示状态" > <template slot-scope="scope"> <el-switch v-model="scope.row.showStatus" active-color="#13ce66" inactive-color="#ff4949" :active-value="1" :inactive-value="0" @change="updateBrandStatus(scope.row)" > </el-switch> </template> </el-table-column>
1
2
3
4
5
6
7
8
9
10
11
12
13
14
15
16
17
18
19
methods: { updateBrandStatus (data ) console .log("当前scope.row:" , data); let { brandId, showStatus } = data; this .$http({ url : this .$http.adornUrl("/product/brand/update" ), method : "post" , data : this .$http.adornData({ brandId, showStatus }, false ) }).then(({ data } ) => { this .$message({ type : "success" , message : "状态更新成功" }); }); }, }
云存储服务(文件上传前后端)
老样子阿里云OSS,这里使用了子用户AK
文档:安装 (aliyun.com)
AliyunOSS 依赖 1 2 3 4 5 <dependency > <groupId > com.aliyun.oss</groupId > <artifactId > aliyun-sdk-oss</artifactId > <version > 3.10.2</version > </dependency >
上传文件
下面是官网文档的demo
1 2 3 4 5 6 7 8 9 10 11 12 13 14 15 16 String endpoint = "yourEndpoint" ; String accessKeyId = "yourAccessKeyId" ; String accessKeySecret = "yourAccessKeySecret" ; OSS ossClient = new OSSClientBuilder().build(endpoint, accessKeyId, accessKeySecret); InputStream inputStream = new FileInputStream("D:\\localpath\\examplefile.txt" ); ossClient.putObject("examplebucket" , "exampledir/exampleobject.txt" , inputStream); ossClient.shutdown();
子用户
AK进入后创建子用户,然后分配权限(现在用到的权限就AliyunOSSFullAccess,用于读写)
SpringCloudAlibabaOSS
直接用
文档:spring-cloud-alibaba-component/README.md at master · ylh23y/spring-cloud-alibaba-component (github.com)
依赖 1 2 3 4 5 <dependency > <groupId > com.alibaba.cloud</groupId > <artifactId > spring-cloud-starter-alicloud-oss</artifactId > </dependency >
配置application.yml 1 2 3 4 5 6 7 8 spring: cloud: alicloud: access-key: secret-key: oss: endpoint:
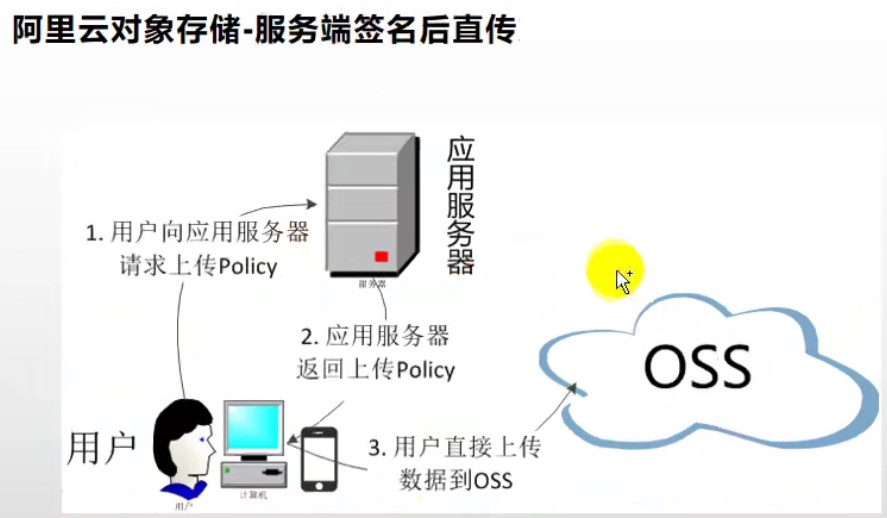
服务端签名后上传(后端)
文档:服务端签名后直传 (aliyun.com)
创建第三方服务模块
创建专门的模块third-party
将上述的依赖改到这个第三方服务的模块中
依赖 1 2 3 4 5 6 7 8 9 10 11 12 13 14 15 16 17 18 <dependency > <groupId > com.atguigu.gulimall</groupId > <artifactId > gulimall-common</artifactId > <version > 0.0.1-SNAPSHOT</version > <exclusions > <exclusion > <groupId > com.baomidou</groupId > <artifactId > mybatis-plus-boot-starter</artifactId > </exclusion > </exclusions > </dependency > <dependency > <groupId > com.alibaba.cloud</groupId > <artifactId > spring-cloud-starter-alicloud-oss</artifactId > </dependency >
配置nacos
bootstrap.properties中配置
1 2 3 4 5 6 spring.cloud.nacos.config.server-addr =127.0.0.1:8848 spring.cloud.nacos.config.namespace =925cc47f-8b1d-4756-ba4d-c8da28f784c9 spring.cloud.nacos.config.ext-config[0].data-id =oss.yml spring.cloud.nacos.config.ext-config[0].group =DEFAULT_GROUP spring.cloud.nacos.config.ext-config[0].refresh =true
配置alicloud
在application.yml中,也可以在nacos配置中心配
1 2 3 4 5 6 7 8 9 10 11 12 13 14 15 16 17 18 19 spring: cloud: nacos: discovery: server-addr: 127.0 .0 .1 :8848 alicloud: access-key: secret-key: oss: endpoint: bucket: application: name: gulimall-third-party server: port: 30000
单元测试 1 2 3 4 5 6 7 8 9 10 11 12 13 14 15 @RunWith(SpringRunner.class) @SpringBootTest public class GulimallThirdPartyApplicationTests @Autowired OSSClient ossClient; @Test public void aliyunOssTest () throws FileNotFoundException InputStream inputStream = new FileInputStream("C:\\Users\\卢荟\\Desktop\\谷粒电商\\1\\docs\\pics\\6a1b2703a9ed8737.jpg" ); ossClient.putObject("lh-demo-gulimall" , "test2.jpg" , inputStream); ossClient.shutdown(); System.out.println("上传完成" ); } }
编写OSSController
这里有一个点要注意,自动注入OSS接口,而不是OSSClient实现类
见P63,debug几秒钟绝了
1 2 3 4 5 6 7 8 9 10 11 12 13 14 15 16 17 18 19 20 21 22 23 24 25 26 27 28 29 30 31 32 33 34 35 36 37 38 39 40 41 42 43 44 45 46 47 48 49 50 @RestController public class OssController @Autowired OSS ossClient; @Value("${spring.cloud.alicloud.oss.endpoint}") private String endpoint; @Value("${spring.cloud.alicloud.oss.bucket}") private String bucket; @Value("${spring.cloud.alicloud.access-key}") private String accessId; @RequestMapping("/oss/policy") public R policy () String host = "https://" + bucket + "." + endpoint; String format = new SimpleDateFormat("yyyy-MM-dd" ).format(new Date()); String dir = format + "/" ; Map<String, String> respMap = null ; try { long expireTime = 30 ; long expireEndTime = System.currentTimeMillis() + expireTime * 1000 ; Date expiration = new Date(expireEndTime); PolicyConditions policyConds = new PolicyConditions(); policyConds.addConditionItem(PolicyConditions.COND_CONTENT_LENGTH_RANGE, 0 , 1048576000 ); policyConds.addConditionItem(MatchMode.StartWith, PolicyConditions.COND_KEY, dir); String postPolicy = ossClient.generatePostPolicy(expiration, policyConds); byte [] binaryData = postPolicy.getBytes("utf-8" ); String encodedPolicy = BinaryUtil.toBase64String(binaryData); String postSignature = ossClient.calculatePostSignature(postPolicy); respMap = new LinkedHashMap<String, String>(); respMap.put("accessid" , accessId); respMap.put("policy" , encodedPolicy); respMap.put("signature" , postSignature); respMap.put("dir" , dir); respMap.put("host" , host); respMap.put("expire" , String.valueOf(expireEndTime / 1000 )); } catch (Exception e) { System.out.println(e.getMessage()); } finally { ossClient.shutdown(); } return R.ok().put("data" , respMap); } }
然后就可以通过访问localhost:30000/oss/policy 获取签名等数据
配置网关application.yml 1 2 3 4 5 6 7 8 9 10 11 12 spring: cloud: gateway: routes: - id: third_party_route uri: lb://gulimall-third-party predicates: - Path=/api/thirdparty/** filters: - RewritePath=/api/thirdparty/(?<segment>.*),/$\{segment}
文件上传(前端)
资料里有封装好的模板,放入component,将其中el-upload中action属性值改为oss bucket的域名
vue
使用上述组件
注意这里component里面的名字要和import对应,要不然不报错还显示不出来问题(差点吓死我)
1 2 3 4 5 6 7 <el-form-item label="品牌logo地址" prop="logo"> <singleUpload v-model="dataForm.logo"> </singleUpload> </el-form-item> <script> import singleUpload from "@/components/upload/singleUpload"; export default { components: { singleUpload },
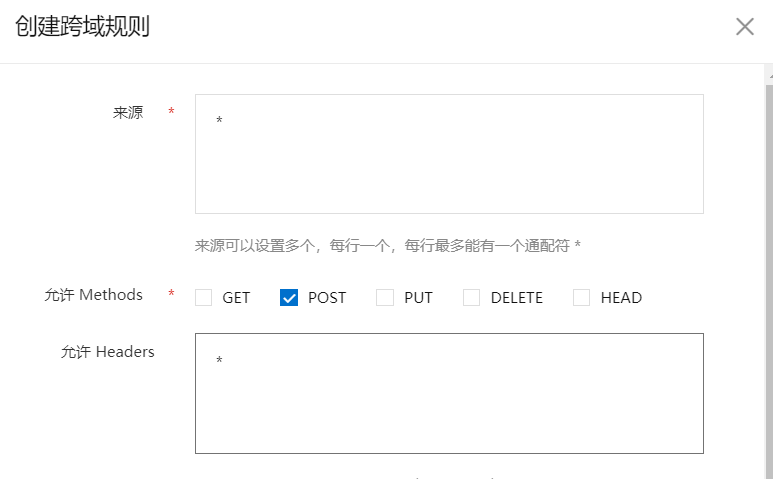
开启跨域
OSS控制台里进入bucket,创建规则
测试
OK,主要实现可以去看组件里的实现
表单数据校验(前端) 优化列表显示
logo显示图片
表单校验
使用element-ui的表单验证,自定义校验规则
1 2 3 4 5 6 7 8 9 10 <el-form-item label ="检索首字母" prop ="firstLetter" > <el-input v-model ="dataForm.firstLetter" placeholder ="检索首字母" > </el-input > </el-form-item > <el-form-item label ="排序" prop ="sort" > <el-input v-model.number ="dataForm.sort" placeholder ="排序" > </el-input > </el-form-item >
1 2 3 4 5 6 7 8 9 10 11 12 13 14 15 16 17 18 19 20 21 22 23 24 25 26 27 28 29 30 31 32 33 34 35 36 37 38 data ( return { dataRule : { firstLetter : [ { validator : (rule, value, callback ) => { if (value === "" ) { callback(new Error ("首字母必须填写" )); } else if (!/^[a-zA-Z]$/ .test(value)) { callback(new Error ("首字母必须a-z或者A-Z之间的单个字母" )); } else { callback(); } }, trigger : "blur" } ], sort : [ { validator : (rule, value, callback ) => { if (value === "" ) { callback(new Error ("排序字段必须填写" )); } else if (!Number .isInteger(value)) { callback(new Error ("请输入数字值" )); } else if (value < 0 ) { callback(new Error ("排序字段必须大于0" )); } else { callback(); } }, trigger : "blur" } ] } }; },
表单数据校验(后端) 普通校验 Bean校验注解 校验规则
@xxx javax.validation.constraints下的注解,用于定义校验规则
1 2 3 4 5 6 7 8 9 10 11 12 13 14 15 16 17 18 19 20 21 22 23 24 25 26 27 28 29 30 31 32 33 34 35 36 37 38 39 40 41 42 43 44 @Data @TableName("pms_brand") public class BrandEntity implements Serializable private static final long serialVersionUID = 1L ; @TableId private Long brandId; @NotEmpty @NotBlank(message = "品牌名不能为空") private String name; @NotEmpty @URL(message = "LOGO必须是合法的URL地址") private String logo; @NotEmpty private String descript; @NotNull private Integer showStatus; @NotEmpty @Pattern(regexp = "/^[a-zA-Z]$/", message = "检索字母必须是a-z或者A-Z中的单个字母") private String firstLetter; @NotEmpty @Min(value = 0) private Integer sort; }
Controller校验注解 开启校验
@Valid 开启校验
1 2 3 4 5 6 7 8 9 10 11 12 13 14 15 @RestController @RequestMapping("product/brand") public class BrandController @Autowired private BrandService brandService; @RequestMapping("/save") public R save (@Valid @RequestBody BrandEntity brand) brandService.save(brand); return R.ok(); } }
获取校验结果
BindingResult result封装了紧跟着的对象的校验结果
1 2 3 4 5 6 7 8 9 10 11 12 13 14 15 16 17 18 19 20 21 @RequestMapping("/save") public R save (@Valid @RequestBody BrandEntity brand, BindingResult result) if (result.hasErrors()) { Map<String, String> map = new HashMap<>(); result.getFieldErrors().forEach((fieldError) -> { String message = fieldError.getDefaultMessage(); String fieldName = fieldError.getField(); map.put(fieldName, message); }); return R.error(400 , "递交的数据不合法" ).put("data" , map); } else { brandService.save(brand); return R.ok(); } }
这个写法可以使用统一异常处理类解决
JSR303分组校验
设想brandId,有两种情况:一是新增,二是修改。当新增的时候我们不需要传入id,而修改的时候需要,那这个时候就需要用到分组校验。
编写接口
使用valid中的注解,里面有一个属性group用于分组,后跟接口类型(只是用于标识区别,接口中不比写代码)
Bean校验注释 带分组 1 2 3 4 5 6 7 8 9 10 11 12 13 @NotNull(message = "修改必须指定id", groups = {UpdateGroup.class}) @Null(message = "新增不能指定id", groups = {AddGroup.class}) @TableId private Long brandId; @NotEmpty @NotBlank(message = "品牌名不能为空",, groups = {AddGroup.class, UpdateGroup.class}) private String name;
没有指定group的默认不校验(如果是使用了@Validated({XXX.class})分组校验的情况下)
Controller校验注释 带分组 1 2 3 4 5 6 7 8 9 10 @RequestMapping("/save") public R save (@Validated({AddGroup.class}) @RequestBody BrandEntity brand) brandService.save(brand); return R.ok(); }
自定义校验注解 依赖 1 2 3 4 5 6 <dependency > <groupId > javax.validation</groupId > <artifactId > validation-api</artifactId > <version > 2.0.1.Final</version > </dependency >
配置文件ValidationMessages.properties 1 com.atguigu.common.valid.ListValue.message =必须提交指定的值
别的也可以写在这里面
自定义校验器ListValueConstraintValidator 1 2 3 4 5 6 7 8 9 10 11 12 13 14 15 16 17 18 19 20 21 22 public class ListValueConstraintValidator implements ConstraintValidator <ListValue , Integer > private Set<Integer> set = new HashSet<>(); @Override public void initialize (ListValue constraintAnnotation) int [] vals = constraintAnnotation.vals(); for (int val : vals) { set.add(val); } } @Override public boolean isValid (Integer value, ConstraintValidatorContext context) return set.contains(value); } }
自定义校验注解ListValue 1 2 3 4 5 6 7 8 9 10 11 12 13 14 15 16 @Documented @Constraint(validatedBy = {ListValueConstraintValidator.class}) @Target({METHOD, FIELD, ANNOTATION_TYPE, CONSTRUCTOR, PARAMETER, TYPE_USE}) @Retention(RUNTIME) public @interface ListValue { String message () default " {com.atguigu.common.valid.ListValue.message}"; Class<?>[] groups() default {}; Class<? extends Payload>[] payload() default {}; int[] vals() default {}; }
Bean注解 1 2 3 4 5 6 @NotNull(message = "必须指定显示状态[0-不显示;1-显示]", groups = {AddGroup.class, UpdateGroup.class}) @ListValue(vals = {0, 1}, groups = {AddGroup.class}) private Integer showStatus;
controller注解 1 2 3 4 5 6 7 8 9 10 @RequestMapping("/save") public R save (@Validated({AddGroup.class}) @RequestBody BrandEntity brand) brandService.save(brand); return R.ok(); }
统一异常处理
上述不同结果不同返回,可以使用统一异常处理解决重复代码的编写问题
统一异常处理类
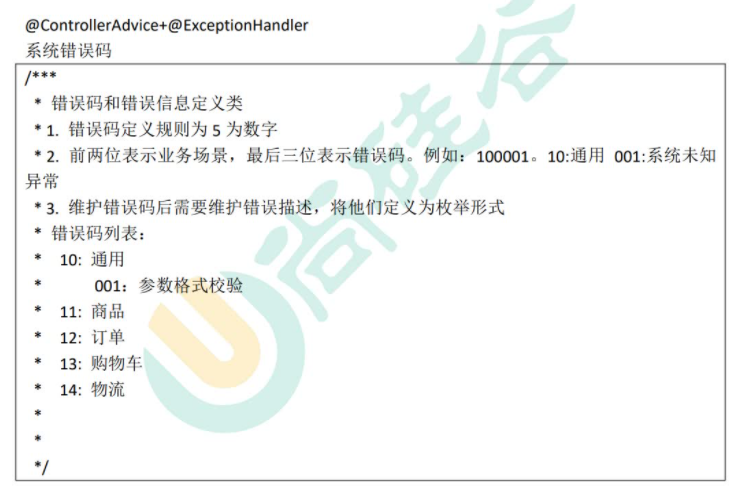
使用两个注解@RestControllerAdvice+@ExceptionHandler
1 2 3 4 5 6 7 8 9 10 11 12 13 14 15 16 17 18 19 20 21 @ResponseBody @Slf4j @RestControllerAdvice(basePackages = "com.atguigu.gulimall.product.controller") public class GulimallExceptionControllerAdvice @ExceptionHandler(value = MethodArgumentNotValidException.class) public R handleValidException (MethodArgumentNotValidException e) log.error("数据校验有误{},异常类型{}" , e.getMessage(), e.getClass()); Map<String, String> errorMap = new HashMap<>(); BindingResult bindingResult = e.getBindingResult(); bindingResult.getFieldErrors().forEach((item) -> { errorMap.put(item.getField(), item.getDefaultMessage()); }); return R.error(400 , "数据校验有误" ).put("data" , errorMap); } }
则controller中的方法不再需要进行判断,出现异常后统一抛出给这个类处理
系统错误码(枚举)
可以写一个枚举,放在common里面
1 2 3 4 5 6 7 8 9 10 11 12 13 14 15 16 17 18 19 20 21 22 23 public enum BizCodeEnum UNKNOWN_EXCEPTION(10000 , "系统未知异常" ), VALID_EXCEPTION(10001 , "参数格式校验失败" ); private Integer code; private String msg; BizCodeEnum(int code, String msg) { this .code = code; this .msg = msg; } public Integer getCode () return code; } public String getMsg () return msg; } }
统一异常处理类(使用错误码) 1 2 3 4 5 6 7 8 9 10 11 12 13 14 15 16 17 18 19 20 21 22 23 24 25 @ResponseBody @Slf4j @RestControllerAdvice(basePackages = "com.atguigu.gulimall.product.controller") public class GulimallExceptionControllerAdvice @ExceptionHandler(value = MethodArgumentNotValidException.class) public R handleValidException (MethodArgumentNotValidException e) log.error("数据校验有误{},异常类型{}" , e.getMessage(), e.getClass()); Map<String, String> errorMap = new HashMap<>(); BindingResult bindingResult = e.getBindingResult(); bindingResult.getFieldErrors().forEach((item) -> { errorMap.put(item.getField(), item.getDefaultMessage()); }); return R.error(BizCodeEnum.VALID_EXCEPTION.getCode(), BizCodeEnum.VALID_EXCEPTION.getMsg()).put("data" , errorMap); } @ExceptionHandler(value = Throwable.class) public R handleException (Throwable throwable) return R.error(BizCodeEnum.UNKNOWN_EXCEPTION.getCode(), BizCodeEnum.UNKNOWN_EXCEPTION.getMsg()); } }
属性分组(前后端) SKU & SPU & 规则参数 & 销售属性
SPU: Standard Product Unit(标准化产品单元)
SKU: Stock Keeping Unit(库存量单位)
每个分类下的商品共享规格参数, 与销售属性。 只是有些商品不一定要用这个分类下全部的
属性是以三级分类组织起来的
规格参数中有些是可以提供检索的
规格参数也是基本属性, 他们具有自己的分组
属性的分组也是以三级分类组织起来的
属性名确定的, 但是值是每一个商品不同来决定的
数据库设计
P70
前端基础搭建
人人快速开发平台 —》系统管理 —》菜单管理 —》添加菜单
抽取三级分类
把category中显示的部分拿出来,放到单独的vue中,然后在需要使用的vue中import组件,并且在component中声明,然后直接使用组件名标签即可
逆向工程
生成attrgroup放到布局的右边,左边放三级分类
VUE父子组件传递数据 子组件->父组件
使用事件机制,子组件给父组件发送时间并携带数据
1 2 3 4 5 6 7 8 9 10 11 12 13 14 15 16 17 18 <template> <el-tree @node-click="nodeClick" > </el-tree> </template> <script> export default { methods: { // 节点点击事件 nodeClick(data, node, component) { // 向父组件发送时间 this.$emit("tree-node-click", data, node, component); } } }; </script>
1 2 3 4 5 6 7 8 9 10 11 12 13 14 15 16 17 18 19 20 <!-- --> <template> <div class=""> <el-row :gutter="20"> <el-col :span="6" ><category @tree-node-click="nodeClick"></category ></el-col> </el-row> </div> </template> <script> export default { methods: { // 子组件事件响应 nodeClick(data, node, component) { console.log("父组件捕获事件并获取数据:", data, node, component); }, } }; </script>
获取分类属性分组(后端) AttrGroupController 1 2 3 4 5 6 7 8 9 @RequestMapping("/list/{catelogId}") public R list (@RequestParam Map<String, Object> params, @PathVariable Long catelogId) PageUtils page = attrGroupService.queryPage(params, catelogId); return R.ok().put("page" , page); }
AttrGroupServiceImpl 1 2 3 4 5 6 7 8 9 10 11 12 13 14 15 16 17 18 19 20 @Override public PageUtils queryPage (Map<String, Object> params, Long catelogId) if (catelogId == 0 ) { IPage<AttrGroupEntity> page = this .page(new Query<AttrGroupEntity>().getPage(params), new QueryWrapper<>()); return new PageUtils(page); } else { String key = (String) params.get("key" ); QueryWrapper<AttrGroupEntity> wrapper = new QueryWrapper<AttrGroupEntity>().eq("catelog_id" , catelogId); if (!StringUtils.isEmpty(key)) { wrapper.and((obj) -> { obj.eq("attr_group_id" , key).or().like("attr_group_name" , key); }); } IPage<AttrGroupEntity> page = this .page(new Query<AttrGroupEntity>().getPage(params), wrapper); return new PageUtils(page); } }
新增、修改分组 & 级联选择器
当字段为空时不返回空值 1 2 3 4 5 6 @JsonInclude(JsonInclude.Include.NON_EMPTY) @TableField(exist = false) private List<CategoryEntity> children;
新增分组
/#/product-attrgroup
1 2 3 4 5 6 7 8 9 10 11 12 13 14 15 16 17 18 19 20 21 22 23 24 25 26 27 28 29 30 31 32 33 34 35 36 37 38 39 40 41 42 43 44 45 46 47 48 49 50 51 52 53 54 55 56 57 58 59 60 61 62 63 64 65 66 67 68 69 70 71 72 73 74 75 76 77 78 79 80 81 82 83 84 85 86 87 88 89 90 91 92 93 94 95 96 97 98 99 100 101 102 103 104 105 106 107 108 109 110 111 112 113 114 115 116 117 118 119 120 121 122 123 124 125 126 127 128 129 130 131 132 133 134 135 136 137 138 139 140 141 142 143 144 145 146 147 148 149 150 151 152 153 154 155 156 157 158 159 160 <template> <el-dialog :title="!dataForm.attrGroupId ? '新增' : '修改'" :close-on-click-modal="false" :visible.sync="visible" > <el-form :model="dataForm" :rules="dataRule" ref="dataForm" @keyup.enter.native="dataFormSubmit()" label-width="80px" > <el-form-item label="组名" prop="attrGroupName"> <el-input v-model="dataForm.attrGroupName" placeholder="组名" ></el-input> </el-form-item> <el-form-item label="排序" prop="sort"> <el-input v-model="dataForm.sort" placeholder="排序"></el-input> </el-form-item> <el-form-item label="描述" prop="descript"> <el-input v-model="dataForm.descript" placeholder="描述"></el-input> </el-form-item> <el-form-item label="组图标" prop="icon"> <el-input v-model="dataForm.icon" placeholder="组图标"></el-input> </el-form-item> <el-form-item label="所属分类id" prop="catelogId"> <el-cascader v-model="dataForm.catelogIds" :options="categorys" :props="props" ></el-cascader> </el-form-item> </el-form> <span slot="footer" class="dialog-footer"> <el-button @click="visible = false">取消</el-button> <el-button type="primary" @click="dataFormSubmit()">确定</el-button> </span> </el-dialog> </template> <script> export default { data() { return { categorys: [], props: { value: "catId", label: "name", children: "children" }, visible: false, dataForm: { attrGroupId: 0, attrGroupName: "", sort: "", descript: "", icon: "", catelogIds: [], catelogId: 0 }, dataRule: { attrGroupName: [ { required: true, message: "组名不能为空", trigger: "blur" } ], sort: [{ required: true, message: "排序不能为空", trigger: "blur" }], descript: [ { required: true, message: "描述不能为空", trigger: "blur" } ], icon: [{ required: true, message: "组图标不能为空", trigger: "blur" }], catelogId: [ { required: true, message: "所属分类id不能为空", trigger: "blur" } ] } }; }, created() { this.getMenus(); }, methods: { // 获取所有分类 getMenus() { this.$http({ url: this.$http.adornUrl("/product/category/list/tree"), method: "get" }).then(({ data }) => { console.log(data); // 这里data使用了解构 this.categorys = data.data; }); }, init(id) { this.dataForm.attrGroupId = id || 0; this.visible = true; this.$nextTick(() => { this.$refs["dataForm"].resetFields(); if (this.dataForm.attrGroupId) { this.$http({ url: this.$http.adornUrl( `/product/attrgroup/info/${this.dataForm.attrGroupId}` ), method: "get", params: this.$http.adornParams() }).then(({ data }) => { if (data && data.code === 0) { this.dataForm.attrGroupName = data.attrGroup.attrGroupName; this.dataForm.sort = data.attrGroup.sort; this.dataForm.descript = data.attrGroup.descript; this.dataForm.icon = data.attrGroup.icon; this.dataForm.catelogId = data.attrGroup.catelogId; } }); } }); }, // 表单提交 dataFormSubmit() { this.$refs["dataForm"].validate(valid => { if (valid) { this.$http({ url: this.$http.adornUrl( `/product/attrgroup/${ !this.dataForm.attrGroupId ? "save" : "update" }` ), method: "post", data: this.$http.adornData({ attrGroupId: this.dataForm.attrGroupId || undefined, attrGroupName: this.dataForm.attrGroupName, sort: this.dataForm.sort, descript: this.dataForm.descript, icon: this.dataForm.icon, catelogId: this.dataForm.catelogIds[ this.dataForm.catelogIds.length - 1 ] }) }).then(({ data }) => { if (data && data.code === 0) { this.$message({ message: "操作成功", type: "success", duration: 1500, onClose: () => { this.visible = false; this.$emit("refreshDataList"); } }); } else { this.$message.error(data.msg); } }); } }); } } }; </script>
非数据库中的字段@TableField(exist = false) 1 2 3 4 5 @TableField(exist = false) private Long[] catelogPath;
级联选择器回显(后端)
用于搜索分类的完整路径然后回显给级联选择器
1 2 3 4 5 6 7 8 9 10 11 12 13 14 15 16 17 18 19 @RestController @RequestMapping("product/attrgroup") public class AttrGroupController @RequestMapping("/info/{attrGroupId}") public R info (@PathVariable("attrGroupId") Long attrGroupId) AttrGroupEntity attrGroup = attrGroupService.getById(attrGroupId); Long catelogId = attrGroup.getCatelogId(); Long[] path = categoryService.findCategoryPath(catelogId); attrGroup.setCatelogPath(path); return R.ok().put("attrGroup" , attrGroup); } }
1 2 3 4 5 6 7 8 9 10 11 12 13 14 15 16 17 @Override public Long[] findCategoryPath(Long catelogId) { List<Long> path = new ArrayList<>(); List<Long> parentPath = findParentPath(catelogId, path); Collections.reverse(parentPath); return parentPath.toArray(new Long[0 ]); } private List<Long> findParentPath (Long catelogId, List<Long> path) path.add(catelogId); CategoryEntity byId = this .getById(catelogId); if (byId.getParentCid() != 0 ) { findParentPath(byId.getParentCid(), path); } return path; }
级联选择器回显(前端) 1 2 3 4 5 6 7 8 9 10 11 12 13 14 15 16 17 18 19 20 21 22 23 24 25 26 27 init (id ) this .dataForm.attrGroupId = id || 0 ; this .visible = true ; this .$nextTick(() => { this .$refs["dataForm" ].resetFields(); if (this .dataForm.attrGroupId) { this .$http({ url : this .$http.adornUrl( `/product/attrgroup/info/${this .dataForm.attrGroupId} ` ), method : "get" , params : this .$http.adornParams() }).then(({ data } ) => { if (data && data.code === 0 ) { this .dataForm.attrGroupName = data.attrGroup.attrGroupName; this .dataForm.sort = data.attrGroup.sort; this .dataForm.descript = data.attrGroup.descript; this .dataForm.icon = data.attrGroup.icon; this .dataForm.catelogId = data.attrGroup.catelogId; this .dataForm.catelogPath = data.attrGroup.catelogPath; } }); } }); },
1 2 3 4 5 6 7 8 9 addOrUpdateHandle (id ) this .addOrUpdateVisible = true ; this .$nextTick(() => { this .$refs.addOrUpdate.init(id); }); },
1 2 3 4 5 6 7 8 9 <el-dialog :title ="!dataForm.attrGroupId ? '新增' : '修改'" :close-on-click-modal ="false" :visible.sync ="visible" @closed ="dialogClose" >
1 2 3 4 5 6 methods: { dialogClose ( this .dataForm.catelogPath = []; }, }
品牌管理页面
之前页面完善一下
MyBatis-Plus分页插件
写法与版本有关,注意官网文档
1 2 3 4 5 6 7 8 9 10 11 12 13 14 15 16 17 18 19 20 21 22 23 package com.atguigu.gulimall.product.config;import com.baomidou.mybatisplus.extension.plugins.PaginationInterceptor;import org.mybatis.spring.annotation.MapperScan;import org.springframework.context.annotation.Bean;import org.springframework.context.annotation.Configuration;import org.springframework.transaction.annotation.EnableTransactionManagement;@Configuration @EnableTransactionManagement @MapperScan("com.atguigu.gulimall.product.dao") public class MybatisPlusConfig @Bean public PaginationInterceptor paginationInterceptor () PaginationInterceptor paginationInterceptor = new PaginationInterceptor(); paginationInterceptor.setOverflow(true ); paginationInterceptor.setLimit(1000 ); return paginationInterceptor; } }
模糊查询
去page对象中添加querywrapper即可
1 2 3 4 5 6 7 8 9 10 11 12 13 14 15 16 17 @Service("brandService") public class BrandServiceImpl extends ServiceImpl <BrandDao , BrandEntity > implements BrandService @Override public PageUtils queryPage (Map<String, Object> params) QueryWrapper<BrandEntity> queryWrapper = new QueryWrapper<>(); String key = (String) params.get("key" ); if (!StringUtils.isEmpty(key)) { queryWrapper.eq("brand_id" , key).or().like("name" , key); } IPage<BrandEntity> page = this .page( new Query<BrandEntity>().getPage(params), queryWrapper ); return new PageUtils(page); } }
品牌分类关联
一个品牌可能做多种产品,所以需要关联
实现查询关联列表和新增关联
数据表
抽取出来一个category_brand_relation表,因为是多对多的关系
查询、新增品牌关联(后端) 1 2 3 4 5 6 7 8 9 10 11 12 13 14 15 16 17 18 19 20 21 22 23 24 @RestController @RequestMapping("product/categorybrandrelation") public class CategoryBrandRelationController @Autowired private CategoryBrandRelationService categoryBrandRelationService; @GetMapping("/catelog/list") public R relationList (@RequestParam("brandId") Long brandId) List<CategoryBrandRelationEntity> data = categoryBrandRelationService.list( new QueryWrapper<CategoryBrandRelationEntity>().eq("brand_id" , brandId)); return R.ok().put("data" , data); } @PostMapping("/save") public R save (@RequestBody CategoryBrandRelationEntity categoryBrandRelation) categoryBrandRelationService.mySave(categoryBrandRelation); return R.ok(); } }
1 2 3 4 5 6 7 8 9 10 11 12 13 14 15 16 17 18 19 20 21 22 @Service("categoryBrandRelationService") public class CategoryBrandRelationServiceImpl extends ServiceImpl <CategoryBrandRelationDao , CategoryBrandRelationEntity > implements CategoryBrandRelationService @Autowired BrandDao brandDao; @Autowired CategoryDao categoryDao; @Override public void mySave (CategoryBrandRelationEntity categoryBrandRelation) Long brandId = categoryBrandRelation.getBrandId(); Long catelogId = categoryBrandRelation.getCatelogId(); BrandEntity brandEntity = brandDao.selectById(brandId); categoryBrandRelation.setBrandName(brandEntity.getName()); CategoryEntity categoryEntity = categoryDao.selectById(catelogId); categoryBrandRelation.setCatelogName(categoryEntity.getName()); baseMapper.insert(categoryBrandRelation); } }
连表修改
例如修改品牌信息,不仅要修改brand表,还有修改category_brand_relation等相关表
1 2 3 4 5 6 7 8 9 10 11 12 13 14 15 16 17 @Service("brandService") public class BrandServiceImpl extends ServiceImpl <BrandDao , BrandEntity > implements BrandService @Override public void updateDetail (BrandEntity brand) this .updateById(brand); if (!StringUtils.isEmpty(brand.getName())) { categoryBrandRelationService.updateBrand(brand.getBrandId(), brand.getName()); } } }
1 2 3 4 5 6 7 8 9 10 11 12 13 14 15 16 @Service("categoryBrandRelationService") public class CategoryBrandRelationServiceImpl extends ServiceImpl <CategoryBrandRelationDao , CategoryBrandRelationEntity > implements CategoryBrandRelationService @Override public void updateBrand (Long brandId, String name) CategoryBrandRelationEntity entity = new CategoryBrandRelationEntity(); entity.setBrandName(name); entity.setBrandId(brandId); this .update(entity, new UpdateWrapper<CategoryBrandRelationEntity>().eq("brand_id" , brandId)); } }
修改分类信息也是如此,只不过换了一种写法,写在了Mapper中
1 2 3 4 5 6 7 8 9 10 11 @Service("categoryService") public class CategoryServiceImpl extends ServiceImpl <CategoryDao , CategoryEntity > implements CategoryService @Override public void updateDetail (CategoryEntity category) this .updateById(category); categoryBrandRelationService.updateCategory(category.getCatId(), category.getName()); } }
1 2 3 4 5 6 7 8 9 10 11 12 13 14 @Service("categoryBrandRelationService") public class CategoryBrandRelationServiceImpl extends ServiceImpl <CategoryBrandRelationDao , CategoryBrandRelationEntity > implements CategoryBrandRelationService @Override public void updateCategory (Long catId, String name) baseMapper.updateCategory(catId, name); } }
1 2 3 4 @Mapper public interface CategoryBrandRelationDao extends BaseMapper <CategoryBrandRelationEntity > void updateCategory (@Param("catId") Long catId, @Param("name") String name) }
1 2 3 4 5 6 <update id ="updateCategory" > UPDATE gulimall_pms.pms_category_brand_relation SET catelog_name = #{name} WHERE catelog_id = #{catId} </update >