多表连接查询
方式如下
内连接
左外连接
右外连接
课程全部信息查询(后端) 创建值封装对象类 1 2 3 4 5 6 7 8 9 10 11 @Data public class CoursePublishVo private String id; private String title; private String cover; private Integer lessonNum; private String subjectLevelOne; private String subjectLevelTwo; private String teacherName; private String price; }
编写对应mapper接口 1 2 3 public interface EduCourseMapper extends BaseMapper <EduCourse > CoursePublishVo getCoursePublishInfo (String courseId) ; }
编写对应mapper中sql语句
先查询完了之后再贴上来,出错率很高
1 2 3 4 5 6 7 8 9 10 11 12 13 14 15 16 17 18 19 20 <?xml version="1.0" encoding="UTF-8"?> <!DOCTYPE mapper PUBLIC "-//mybatis.org//DTD Mapper 3.0//EN" "http://mybatis.org/dtd/mybatis-3-mapper.dtd" > <mapper namespace ="com.atguigu.eduservice.mapper.EduCourseMapper" > <select id ="getCoursePublishInfo" resultType ="com.atguigu.eduservice.entity.vo.CoursePublishVo" > select ec.id, ec.title, ec.price, ec.lesson_num AS lessonNum, ec.cover, et.name AS teacherName, es1.title AS subjectLevelOne, es2.title AS subjectLevelTwo from edu_course ec left join edu_course_description ecd on ec.id = ecd.id left join edu_teacher et on ec.teacher_id = et.id left join edu_subject es1 on ec.subject_parent_id = es1.id left join edu_subject es2 on ec.subject_id = es2.id where ec.id = #{courseId} </select > </mapper >
编写controller 1 2 3 4 5 6 @PostMapping("getCoursePublishInfo/{courseId}") public R getCoursePublishInfo (@PathVariable String courseId) CoursePublishVo coursePublishInfo = courseService.getCoursePublishInfo(courseId); return R.ok().data("coursePublishInfo" , coursePublishInfo); }
编写service
同理,直接快捷键就行
1 2 3 4 5 @Override public CoursePublishVo getCoursePublishInfo (String courseId) return baseMapper.getCoursePublishInfo(courseId); }
调试
Invalid bound statement (not found): com.atguigu.eduservice.mapper.EduCourseMapper.getCoursePublishInfo
报错如上,解决如下(详见p130)
mapper有没有写错
在target文件夹中xml配置文件有没有被引入
可以把mapper.xml放在resource下
配置pom.xml和application.properties(子模块的pom.xml)
1 mybatis-plus.mapper-locations =classpath:com/atguigu/eduservice/mapper/xml/*.xml
1 2 3 4 5 6 7 8 9 10 11 12 <build > <resources > <resource > <directory > src/main/java</directory > <includes > <include > **/*.xml</include > </includes > <filtering > false</filtering > </resource > </resources > </build >
课程全部信息查询(前端) api 1 2 3 4 5 6 7 getCoursePublishInfo (courseId ) return request({ url : `/eduservice/course/getCoursePublishInfo/` + courseId, method : 'get' , }) }
vue模板和方法 1 2 3 4 5 6 7 8 9 10 11 12 13 14 15 16 17 18 19 20 21 22 23 24 25 26 27 28 29 30 31 32 33 34 35 36 37 38 39 40 41 42 43 44 45 46 47 48 49 50 51 52 53 54 55 56 57 58 59 60 61 62 63 64 65 66 67 68 69 70 71 72 73 74 75 76 77 78 79 80 81 82 83 84 85 <template> <div class="app-container"> <h2 style="text-align: center">发布新课程</h2> <el-steps :active="3" process-status="wait" align-center style="margin-bottom: 40px" > <el-step title="填写课程基本信息" /> <el-step title="创建课程大纲" /> <el-step title="最终发布" /> </el-steps> <div class="ccInfo"> <img :src="coursePublishInfo.cover" /> <div class="main"> <h2>{{ coursePublishInfo.title }}</h2> <p class="gray"> <span>共{{ coursePublishInfo.lessonNum }}课时</span> </p> <p> <span >所属分类:{{ coursePublishInfo.subjectLevelOne }} — {{ coursePublishInfo.subjectLevelTwo }}</span > </p> <p>课程讲师:{{ coursePublishInfo.teacherName }}</p> <h3 class="red">¥{{ coursePublishInfo.price }}</h3> </div> </div> <div> <el-button @click="previous">返回修改</el-button> <el-button :disabled="saveBtnDisabled" type="primary" @click="publish" >发布课程</el-button > </div> </div> </template> <script> import courseApi from '@/api/edu/course.js' export default { data() { return { saveBtnDisabled: false, // 保存按钮是否禁用 courseId: '', // 课程id coursePublishInfo: {} } }, created() { // 获取到路由中的id值 if (this.$route.params && this.$route.params.id) { this.courseId = this.$route.params.id this.getCoursePublishInfo(this.courseId) } console.log(this.coursePublishInfo) }, methods: { getCoursePublishInfo(id) { // 调用api courseApi.getCoursePublishInfo(id).then(result => { console.log this.coursePublishInfo = result.data.coursePublishInfo }) }, previous() { console.log('previous') this.$router.push({ path: '/course/chapter/' + this.courseId }) }, publish() { console.log('publish') this.$router.push({ path: '/course/list' }) } } } </script>
课程发布(后端+前端) 后端
发布就是修改表中一个字段值就行
1 2 3 4 5 6 7 8 @PostMapping("publishCourse/{courseId}") public R publishCourse (@PathVariable String courseId) EduCourse eduCourse = courseService.getById(courseId); eduCourse.setStatus("Normal" ); courseService.updateById(eduCourse); return R.ok(); }
前端
api
1 2 3 4 5 6 7 publishCourse (courseId ) return request({ url : `/eduservice/course/publishCourse/` + courseId, method : 'post' , }) }
method
1 2 3 4 5 publish ( courseApi.publishCourse(this .courseId).then(result => this .$router.push({ path : '/course/list' }) }) }
课程列表(后端+前端) 后端(待完善) 1 2 3 4 5 6 @GetMapping("getCourseList") public R getCourseList () List<EduCourse> list = courseService.list(null ); return R.ok().data("courseList" , list); }
前端 api 1 2 3 4 5 6 7 getCourseList ( return request({ url : `/eduservice/course/getCourseList` , method : 'get' , }) }
vue 1 2 3 4 5 6 7 8 9 10 11 12 13 14 15 16 17 18 19 20 21 22 23 24 25 26 27 28 29 30 31 32 33 34 35 36 37 38 39 40 41 42 43 44 45 46 47 48 49 50 51 52 53 54 55 56 57 58 59 60 61 62 63 64 65 66 67 68 69 70 71 72 73 74 75 76 77 78 79 80 81 82 83 84 85 86 87 88 89 90 91 92 93 94 95 96 97 98 99 100 101 102 103 104 105 106 107 108 109 110 111 112 113 114 115 116 117 118 119 120 121 122 123 124 <template> <div class="app-container"> 课程列表 <!--查询表单--> <el-form :inline="true" class="demo-form-inline"> <el-form-item> <el-input v-model="courseQuery.title" placeholder="课程名称" /> </el-form-item> <el-form-item> <el-select v-model="courseQuery.status" clearable placeholder="课程状态" > <el-option value="Normal" label="已发布" /> <el-option value="Draft" label="未发布" /> </el-select> </el-form-item> <el-button type="primary" icon="el-icon-search" @click="getList()" >查询</el-button > <el-button type="default" @click="resetData()">清空</el-button> </el-form> <!-- 表格 --> <el-table :data="list" border fit highlight-current-row> <el-table-column label="序号" width="70" align="center"> <template slot-scope="scope"> {{ (page - 1) * limit + scope.$index + 1 }} </template> </el-table-column> <el-table-column prop="title" label="课程名称" width="80" /> <el-table-column label="课程状态" width="80"> <template slot-scope="scope"> {{ scope.row.status === "Normal" ? "已发布" : "未发布" }} </template> </el-table-column> <el-table-column prop="lessonNum" label="课时数" /> <el-table-column prop="gmtCreate" label="添加时间" width="160" /> <el-table-column prop="viewCount" label="浏览数量" width="60" /> <el-table-column label="操作" width="200" align="center"> <template slot-scope="scope"> <router-link :to="'/teacher/edit/' + scope.row.id"> <el-button type="primary" size="mini" icon="el-icon-edit" >编辑课程基本信息</el-button > </router-link> <router-link :to="'/teacher/edit/' + scope.row.id"> <el-button type="primary" size="mini" icon="el-icon-edit" >编辑课程大纲息</el-button > </router-link> <el-button type="danger" size="mini" icon="el-icon-delete" @click="removeDataById(scope.row.id)" >删除课程信息</el-button > </template> </el-table-column> </el-table> <!-- 分页 --> <el-pagination :current-page="page" :page-size="limit" :total="total" style="padding: 30px 0; text-align: center" layout="total, prev, pager, next, jumper" @current-change="getList" /> </div> </template> <script> // 引入调用teacher.js文件 import courseApi from '@/api/edu/course' export default { data() { return { list: null, // 查询之后接口返回集合(注意这里是数组用null) page: 1, // 当前页 limit: 10, // 每页记录数 total: 0, // 总记录数 courseQuery: {} // 条件封装对象 } }, created() { // 页面渲染之前执行,一般调用methods定义的方法 // 调用 this.getList() }, methods: { getList() { courseApi.getCourseList().then(response => { // 请求成功 // response接口返回的数据 this.list = response.data.courseList }) }, resetData() { // 表单输入项数据清空 this.courseQuery = {} this.getList() } } } </script>
课程删除(后端+前端)
删除课程:所有章节也会被删除
后端 controller 1 2 3 4 5 6 @DeleteMapping("{courseId}") public R deleteCourse (@PathVariable String courseId) courseService.deleteCourse(courseId); return R.ok(); }
service 1 2 3 4 5 6 7 8 9 10 11 12 13 14 15 @Override public void deleteCourse (String courseId) videoService.removeByCourseId(courseId); chapterService.removeByCourseId(courseId); descriptionService.removeById(courseId); int row = baseMapper.deleteById(courseId); if (row == 0 ) { throw new GuliException(20001 , "删除课程失败" ); } }
1 2 3 4 5 6 7 @Override public void removeByCourseId (String courseId) QueryWrapper<EduChapter> queryWrapper = new QueryWrapper<>(); queryWrapper.eq("course_id" , courseId); baseMapper.delete(queryWrapper); }
前端 api 1 2 3 4 5 6 7 deleteCourse (courseId ) return request({ url : `/eduservice/course/` + courseId, method : 'delete' , }) },
vue 1 2 3 4 5 6 7 8 9 10 11 12 13 14 15 16 17 18 19 20 21 deleteCourse (courseId ) courseApi .deleteCourse(courseId) .then(result => this .$message({ type : 'success' , message : '删除成功!' }) this .getList() }) .catch(err => this .$message({ type : 'error' , message : '删除失败!' }) }) }
阿里云视频点播
视频点播_音视频点播解决方案_视频转码_媒体资源管理系统-阿里云 (aliyun.com)
视频点播 (aliyun.com)
环境搭建
依赖见官网(项目环境搭建的时候已经引入了)
创建模块
子子模块service_vod
引入依赖
注意这个aliyun-java-vod-upload.version依赖未开源,需要手动下载jar包,然后使用命令行安装
mvn install:install-file -DgroupId=com.aliyun -DartifactId=aliyun-java-vod-upload -Dversion=1.4.11 -Dpackaging=jar -Dfile=aliyun-java-vod-upload-1.4.14.jar
注意这里的版本要和下载的jar包对应,还有包名aliyun-java-vod-upload
1 2 3 4 5 6 7 8 9 10 11 12 13 14 15 16 17 18 19 20 21 22 23 24 25 26 27 28 29 30 31 32 33 34 35 36 <dependencies > <dependency > <groupId > com.aliyun</groupId > <artifactId > aliyun-java-sdk-core</artifactId > </dependency > <dependency > <groupId > com.aliyun.oss</groupId > <artifactId > aliyun-sdk-oss</artifactId > </dependency > <dependency > <groupId > com.aliyun</groupId > <artifactId > aliyun-java-sdk-vod</artifactId > </dependency > <dependency > <groupId > com.aliyun</groupId > <artifactId > aliyun-java-vod-upload</artifactId > </dependency > <dependency > <groupId > com.alibaba</groupId > <artifactId > fastjson</artifactId > </dependency > <dependency > <groupId > org.json</groupId > <artifactId > json</artifactId > </dependency > <dependency > <groupId > com.google.code.gson</groupId > <artifactId > gson</artifactId > </dependency > <dependency > <groupId > joda-time</groupId > <artifactId > joda-time</artifactId > </dependency > </dependencies >
测试 根据视频id获取视频播放地址 1 2 3 4 5 6 7 8 9 10 11 12 13 14 15 16 17 18 19 20 21 22 23 24 public class TestVod public static void main (String[] args) throws ClientException DefaultAcsClient client = InitObject.initVodClient("" , "" ); GetPlayInfoRequest request = new GetPlayInfoRequest(); request.setVideoId("" ); GetPlayInfoResponse acsResponse = client.getAcsResponse(request); List<GetPlayInfoResponse.PlayInfo> playInfoList = acsResponse.getPlayInfoList(); for (GetPlayInfoResponse.PlayInfo playInfo : playInfoList) { System.out.print("PlayInfo.PlayURL = " + playInfo.getPlayURL() + "\n" ); } System.out.print("VideoBase.Title = " + acsResponse.getVideoBase().getTitle() + "\n" ); System.out.println(acsResponse); } }
根据视频id获取视频播放凭证 1 2 3 4 5 6 7 8 9 10 11 12 public static void main (String[] args) throws ClientException DefaultAcsClient client = InitObject.initVodClient("" , "" ); GetVideoPlayAuthRequest request = new GetVideoPlayAuthRequest(); request.setVideoId("" ); GetVideoPlayAuthResponse acsResponse = client.getAcsResponse(request); System.out.println("视频凭证: " + acsResponse.getPlayAuth()); }
上传视频
这里注意,如果使用upload的版本为1.4.14,那么根据官方文档说明,oss-sdk的版本必须为3.9及以上,否则会显示一直上传中
1 2 3 4 5 6 7 8 9 10 11 12 13 14 15 16 17 18 19 20 21 22 23 24 25 public static void main (String[] args) throws ClientException String accessKeyId = "" ; String accessKeySecret = "" ; String title = "6 - What If I Want to Move Faster - upload by sdk" ; String fileName = "D:/MyProject/6 - What If I Want to Move Faster.mp4" ; UploadVideoRequest request = new UploadVideoRequest(accessKeyId, accessKeySecret, title, fileName); request.setPartSize(2 * 1024 * 1024L ); request.setTaskNum(1 ); UploadVideoImpl uploader = new UploadVideoImpl(); UploadVideoResponse response = uploader.uploadVideo(request); if (response.isSuccess()) { System.out.print("VideoId=" + response.getVideoId() + "\n" ); } else { System.out.print("VideoId=" + response.getVideoId() + "\n" ); System.out.print("ErrorCode=" + response.getCode() + "\n" ); System.out.print("ErrorMessage=" + response.getMessage() + "\n" ); } }
课程增加、删除小节(视频)功能(完善) 后端 配置文件application.properties 1 2 3 4 5 6 7 8 9 10 11 12 13 14 server.port =8003 spring.application.name =service-vod spring.profiles.active =dev aliyun.vod.file.keyid =aliyun.vod.file.keysecret =spring.servlet.multipart.max-file-size =1024MB spring.servlet.multipart.max-request-size =1024MB
编写常量类 1 2 3 4 5 6 7 8 9 10 11 12 13 14 15 16 17 18 19 20 @Component public class ConstantVodUtils implements InitializingBean @Value("${aliyun.vod.file.keyid}") private String keyid; @Value("${aliyun.vod.file.keysecret}") private String keysecret; public static String ACCESS_KEY_SECRET; public static String ACCESS_KEY_ID; @Override public void afterPropertiesSet () throws Exception ACCESS_KEY_ID = keyid; ACCESS_KEY_SECRET = keysecret; } }
编写初始化VodClient 1 2 3 4 5 6 7 8 9 10 11 @Component public class InitVodClient public static DefaultAcsClient initVodClient (String accessKeyId, String accessKeySecret) throws ClientException String regionId = "cn-shanghai" ; DefaultProfile profile = DefaultProfile.getProfile(regionId, accessKeyId, accessKeySecret); DefaultAcsClient client = new DefaultAcsClient(profile); return client; } }
创建启动类 1 2 3 4 5 6 7 @SpringBootApplication(exclude = DataSourceAutoConfiguration.class) @ComponentScan(basePackages = {"com.atguigu"}) public class VodApplication public static void main (String[] args) SpringApplication.run(VodApplication.class, args); } }
编写controller 1 2 3 4 5 6 7 8 9 10 11 12 13 14 15 16 17 18 19 20 21 @RestController @RequestMapping("/eduvod/video") @CrossOrigin public class VodController @Autowired private VodService vodService; @PostMapping("uploadVideo") public R uploadVideo (MultipartFile file) String videoId = vodService.uploadVideo(file); return R.ok(); } @DeleteMapping("removeVideo/{videoId}") public R removeVideo (@PathVariable String videoId) vodService.removeVideo(videoId); return R.ok(); } }
编写service 1 2 3 4 5 6 7 8 9 10 11 12 13 14 15 16 17 18 19 20 21 22 23 24 25 26 27 28 29 30 31 32 33 34 35 36 37 38 39 40 41 42 43 44 45 46 47 48 49 50 @Service public class VodServiceImpl implements VodService @Override public String uploadVideo (MultipartFile file) try { String fileName = file.getOriginalFilename(); String title = fileName.substring(0 , fileName.lastIndexOf("." )); InputStream inputStream = file.getInputStream(); UploadStreamRequest request = new UploadStreamRequest(ConstantVodUtils.ACCESS_KEY_ID, ConstantVodUtils.ACCESS_KEY_SECRET, title, fileName, inputStream); UploadVideoImpl uploader = new UploadVideoImpl(); UploadStreamResponse response = uploader.uploadStream(request); String videoId = null ; if (response.isSuccess()) { videoId = response.getVideoId(); } else { System.out.print("VideoId=" + response.getVideoId() + "\n" ); System.out.print("ErrorCode=" + response.getCode() + "\n" ); System.out.print("ErrorMessage=" + response.getMessage() + "\n" ); } return videoId; } catch (Exception e) { e.printStackTrace(); return null ; } } @Override public void removeVideo (String videoId) try { DefaultAcsClient client = InitVodClient.initVodClient(ConstantVodUtils.ACCESS_KEY_ID, ConstantVodUtils.ACCESS_KEY_SECRET); DeleteVideoRequest request = new DeleteVideoRequest(); request.setVideoIds(videoId); DeleteVideoResponse acsResponse = client.getAcsResponse(request); } catch (Exception e) { e.printStackTrace(); throw new GuliException(20001 , "删除视频失败" ); } } }
前端 api 1 2 3 4 5 6 7 deleteVideoAli(videoId) { return request({ url: `/eduvod/video/removeVideo/` + videoId, method: 'delete' , }) }
vue模板 1 2 3 4 5 6 7 8 9 10 11 12 13 14 15 16 17 18 19 <el-upload :on-success ="handleVodUploadSuccess" :on-remove ="handleVodRemove" :before-remove ="beforeVodRemove" :on-exceed ="handleUploadExceed" :file-list ="fileList" :action ="BASE_API+'/eduvod/video/uploadVideo'" :limit ="1" class ="upload-demo" > <el-button size ="small" type ="primary" > 上传视频</el-button > <el-tooltip placement ="right-end" > <div slot ="content" > 最大支持1G,<br > 支持3GP、ASF、AVI、DAT、DV、FLV、F4V、<br > GIF、M2T、M4V、MJ2、MJPEG、MKV、MOV、MP4、<br > MPE、MPG、MPEG、MTS、OGG、QT、RM、RMVB、<br > SWF、TS、VOB、WMV、WEBM 等视频格式上传</div > <i class ="el-icon-question" /> </el-tooltip > </el-upload >
调用方法 1 2 3 4 5 6 7 8 9 10 11 12 13 14 15 16 17 18 19 20 21 22 23 24 25 26 beforeVodRemove (file, fileList ) return this .$confirm(`确定移除${file.name} ?` ) }, handleVodRemove ( videoApi.deleteVideoAli(this .video.videoSourceId).then(result => this .$message({ type : 'success' , message : '删除成功!' }) this .fileList = [] this .video.videoSourceId = '' }) }, handleVodUploadSuccess (response, file, fileList ) this .video.videoSourceId = response.data.videoId }, handleUploadExceed ( this .$message.warning('想要重新上传视频,请先删除已上传的视频' ) },
测试
注意这里,要修改nginx的上传文件大小
1 2 3 4 5 http { include mime.types; default_type application/octet-stream; client_max_body_size 1024m; }
由于controller中返回data只有videoId,所以从后端拿不到原始文件吗,所以从前端赋值即可
删除视频后要清空sourceId,要不然不上传视频也有id存留
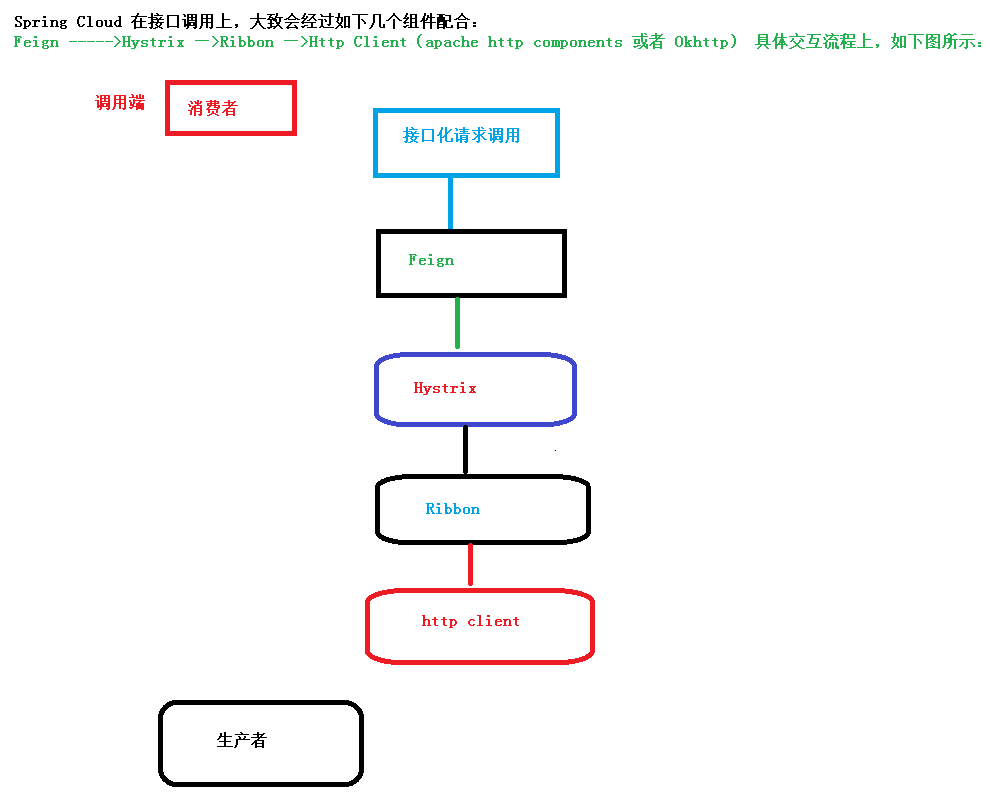
springcloud微服务(删除小节功能完善) springcloud
服务集合,TODO
springcloud调用接口过程
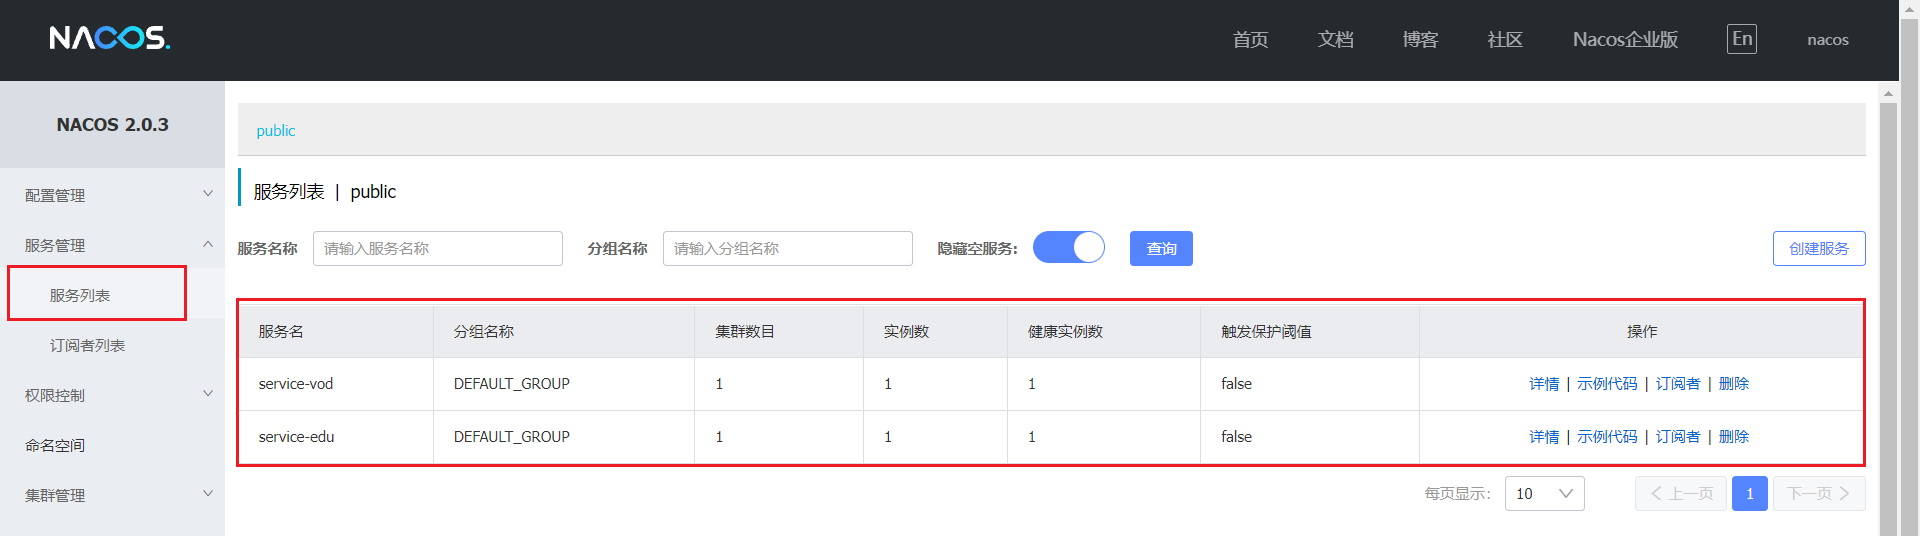
Nacos服务注册
注册中心
home (nacos.io)
启动
下载并解压,然后启动startup.cmd即可,可能会启动失败,需要修改MODE为standalone
Nacos 启动失败_RookieMZL 的博客-CSDN博客_nacos启动失败
依赖
先引入依赖
1 2 3 4 5 <dependency > <groupId > org.springframework.cloud</groupId > <artifactId > spring-cloud-starter-alibaba-nacos-discovery</artifactId > </dependency >
配置
在要注册的服务的配置文件application.properties中配置
1 2 spring.cloud.nacos.discovery.server-addr =127.0.0.1:8848
注解
在启动类上添加注解
1 2 3 4 5 6 @EnableDiscoveryClient public class EduApplication public static void main (String[] args) SpringApplication.run(EduApplication.class, args); } }
测试
致命bug,springboot的版本要2.2.x才行,要不然application启动不起来
http://localhost:8848/nacos
Feign服务调用
前提条件:将互相调用的服务在nacos注册完毕
依赖 1 2 3 4 5 <dependency > <groupId > org.springframework.cloud</groupId > <artifactId > spring-cloud-starter-openfeign</artifactId > </dependency >
添加注解
在需要调用服务的启动类上添加注解如下
1 2 3 4 5 6 7 8 9 @SpringBootApplication @ComponentScan(basePackages = {"com.atguigu"}) @EnableDiscoveryClient @EnableFeignClients public class EduApplication public static void main (String[] args) SpringApplication.run(EduApplication.class, args); } }
创建接口
在调用端创建接口,使用注解指定需要调用哪一个服务,并定义调用的方法和路径
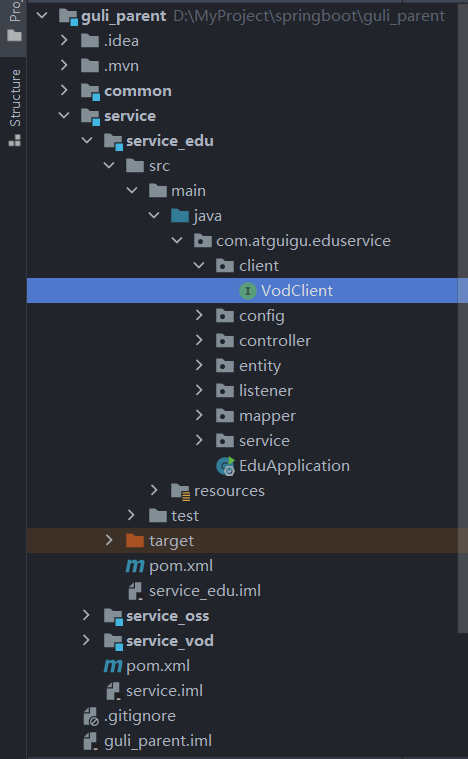
注意结构(service_edu要调用service_vod的功能)
@ Feignclient注解用于指定从哪个服务中调用功能,名称与被调用的服务名保持致。
1 2 3 4 5 6 7 8 @FeignClient("service-vod") @Component public interface VodClient @DeleteMapping("/eduvod/video/removeVideo/{videoId}") public R removeVideo (@PathVariable("videoId") String videoId) }
注意这里的@FeignClient(“service-vod”),服务名不能使用下划线
实现调用(删除小节)
注入接口,调用接口方法即可
1 2 3 4 5 6 7 8 9 10 11 12 13 14 15 16 17 18 @RestController @RequestMapping("/eduservice/video") @CrossOrigin public class EduVideoController @Autowired private VodClient vodClient; @DeleteMapping("{videoId}") public R deleteVideo (@PathVariable("videoId") String videoId) EduVideo eduVideo = videoService.getById(videoId); String videoSourceId = eduVideo.getVideoSourceId(); vodClient.removeVideo(videoSourceId); videoService.removeById(videoId); return R.ok(); } }
如果不成功rerun一下就行了
Hystrix熔断器
提供延迟与容错功能
添加依赖 1 2 3 4 5 6 7 8 9 10 11 <dependency > <groupId > org.springframework.cloud</groupId > <artifactId > spring-cloud-starter-netflix-ribbon</artifactId > </dependency > <dependency > <groupId > org.springframework.cloud</groupId > <artifactId > spring-cloud-starter-netflix-hystrix</artifactId > </dependency >
调用端配置
注意是在调用端,开启熔断器配置,也可使设置超时时间
1 2 feign.hystrix.enabled =true
创建接口对应实现类
编写出错时的输出信息,实现FeignClient接口
1 2 3 4 5 6 7 8 9 10 11 12 @Component public class VodFileDegradeFeignClient implements VodClient @Override public R removeVideo (String videoId) return R.error().message("出错了" ); } @Override public R deleteVideoBatch (List<String> videoIdList) return R.error().message("出错了" ); } }
接口添加属性
feignClient添加注解和属性
1 2 3 4 5 6 @FeignClient(name = "service-vod", fallback = VodFileDegradeFeignClient.class) @Component public interface VodClient }
删除课程(功能完善)
删除视频,删除视频下的章节和小节
后端
video中的删除小节功能需要调用vod中的删除
VodController 1 2 3 4 5 6 @DeleteMapping("deleteVideoBatch") public R deleteVideoBatch (@RequestParam("videoIdList") List<String> videoIdList) vodService.removeBatch(videoIdList); return R.ok(); }
VodService 1 2 3 4 5 6 7 8 9 10 11 12 13 14 15 16 17 18 19 20 @Override public void removeVideoBatch (List<String> videoIdList) try { DefaultAcsClient client = InitVodClient.initVodClient(ConstantVodUtils.ACCESS_KEY_ID, ConstantVodUtils.ACCESS_KEY_SECRET); DeleteVideoRequest request = new DeleteVideoRequest(); String list = StringUtils.join(videoIdList.toArray(), "," ); request.setVideoIds(list); DeleteVideoResponse acsResponse = client.getAcsResponse(request); } catch (Exception e) { e.printStackTrace(); throw new GuliException(20001 , "删除视频失败" ); } }
Feign调用接口
这是service_edu中的
1 2 3 4 5 6 7 8 9 10 11 12 @FeignClient("service-vod") @Component public interface VodClient @DeleteMapping("/eduvod/video/removeVideo/{videoId}") public R removeVideo (@PathVariable("videoId") String videoId) @DeleteMapping("/eduvod/video/deleteVideoBatch") public R deleteVideoBatch (@RequestParam("videoIdList") List<String> videoIdList) }
videoMapper 1 2 3 4 5 6 7 8 9 10 11 12 <?xml version="1.0" encoding="UTF-8"?> <!DOCTYPE mapper PUBLIC "-//mybatis.org//DTD Mapper 3.0//EN" "http://mybatis.org/dtd/mybatis-3-mapper.dtd" > <mapper namespace ="com.atguigu.eduservice.mapper.EduVideoMapper" > <select id ="getVideoIdListByCourse" resultType ="java.lang.String" > SELECT video_source_id FROM `edu_video` WHERE course_id = #{courseId} AND video_source_id IS NOT NULL AND video_source_id != ''; </select > </mapper >
videoService 1 2 3 4 5 6 7 8 9 10 11 12 13 14 15 16 17 18 @Service public class EduVideoServiceImpl extends ServiceImpl <EduVideoMapper , EduVideo > implements EduVideoService @Autowired private VodClient vodClient; @Override public void removeByCourseId (String courseId) List<String> idList = baseMapper.getVideoIdListByCourse(courseId); vodClient.deleteVideoBatch(idList); QueryWrapper wrapper = new QueryWrapper(); wrapper.eq("course_id" , courseId); baseMapper.delete(wrapper); } }
测试
OK
前端
TODO
注意这里有个问题,由于我确定按钮没有绑定是否能够按下的boolean值,所有在文件上传完成之前按下会没有sourceId,之后再改
待续
后台还有好多TODO和完善,竟然就直接进入前台了,好吧还得靠自己