前端技术点简单介绍
一下技术点详见其官方文档或者课件,我就瞄了几眼,之前多多少少也学过了
ES6
Vue
axios
node.js
babel
模块化
webpack
搭建前端环境与框架开发过程 vscode创建工作区
新建一个空文件夹
用VSCode打开该文件夹
选择菜单栏 文件 -> 将文件夹另存为工作区 即可
测试运行npm
复制template文件夹至工作区
安装依赖npm install
npm run dev测试config -> index.js -> useEslint = false关闭代码检查
vue项目实现
src -> router -> index.js 添加路由
views -> xxx -> xxx.vue 创建vue页面
api -> xxx.js 定义接口地址和参数
在vue页面引入js文件,调用方法实现功能
用户登录和跨域(后端+前端) 修改BASE_API(请求路径前缀)
config -> dev.env.js文件
1
2
3
4
5
6
module .exports = merge(prodEnv, { NODE_ENV : '"development"' , BASE_API : '"http://localhost:8001"' , })
编写loginController
先跳过数据库验证
1
2
3
4
5
6
7
8
9
10
11
12
13
14
15
16
17
18
19
20
21
22
23
24
25
26
27
28
29
30
31
package com.atguigu.eduservice.controller;import com.atguigu.commonutils.R;import io.swagger.annotations.Api;import org.springframework.web.bind.annotation.GetMapping;import org.springframework.web.bind.annotation.PostMapping;import org.springframework.web.bind.annotation.RequestMapping;import org.springframework.web.bind.annotation.RestController;@Api("后台登录") @RestController @RequestMapping("/eduservice/user") @CrossOrigin public class EduLoginController @PostMapping("login") public R login () return R.ok().data("token" , "admin" ); } @GetMapping("info") public R info () return R.ok().data("roles" , "[admin]" ).data("name" , "admin" ).data("avatar" , "https://wpimg.wallstcn.com/f778738c-e4f8-4870-b634-56703b4acafe.gif" ); } }
修改前端访问路径
修改api文件夹下的login.js里的接口路径即可
1
2
3
4
5
6
7
8
9
10
11
12
13
14
15
16
17
18
export function login (username, password ) return request({ url : '/eduservice/user/login' , method : 'post' , data : { username, password } }) } export function getInfo (token ) return request({ url : '/eduservice/user/info' , method : 'get' , params : { token } }) }
跨域问题
访问地址的时候,以下任何一个地方不同,会产生跨域问题:
访问协议
IP地址
端口号
在后端controller接口上添加注解@CrossOrigin即可(常用)
使用网关解决
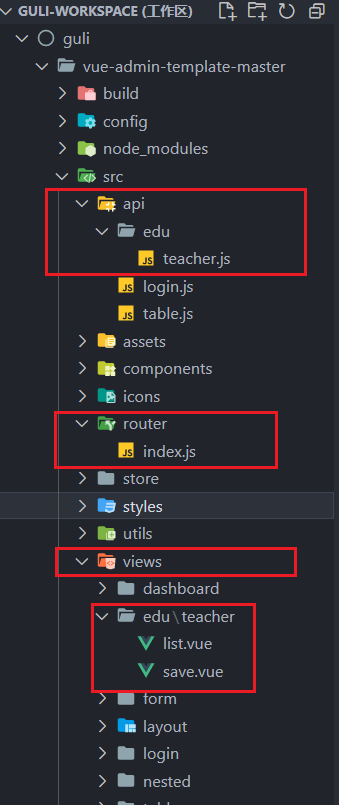
讲师管理模块(前端) 讲师列表 添加路由
src\router\index.js -> constantRouterMap -> children -> component
1
2
3
4
5
6
7
8
9
10
11
12
13
14
15
16
17
18
19
20
21
22
23
24
25
26
export const constantRouterMap = [ { path : '/teacher' , component : Layout, redirect : '/teacher/table' , name : '讲师管理' , meta : { title : '讲师管理' , icon : 'example' }, children : [ { path : 'list' , name : '讲师列表' , component : () => import ('@/views/edu/teacher/list' ), meta : { title : '讲师列表' , icon : 'table' } }, { path : 'save' , name : '添加讲师' , component : () => import ('@/views/edu/teacher/save' ), meta : { title : '添加讲师' , icon : 'tree' } } ] }, }
创建并编写js文件(调用接口)
src\api\edu\teacher.js
1
2
3
4
5
6
7
8
9
10
11
12
13
14
15
16
import request from '@/utils/request' export default { getTeacherListPage (current, limit, teacherQuery ) return request({ url : `/eduservice/teacher/pageTeacherCondition/${current} /${limit} ` , method : 'post' , data : teacherQuery }) } }
创建vue页面,通过接口获取数据
注意routerMap中的对应对象(即创建的router)中component对应的地址,就是vue组件的地址,在该地址下创建vue文件
src\views\edu\teacher\list.vue
1
2
3
4
5
6
7
8
9
10
11
12
13
14
15
16
17
18
19
20
21
22
23
24
25
26
27
28
29
30
31
32
33
34
35
36
37
38
<template> <div class="app-container">讲师列表</div> </template> <script> // 引入调用接口的js文件 import teacher from "@/api/edu/teacher.js"; export default { data() { return { list: null, // 查询接口之后获得的列表 page: 1, // 当前页 limit: 10, // 每页记录数 total: 0, // 总记录数 teacherQuery: {}, // 条件值对象 }; }, created() { this.getList(); }, methods: { // 获得讲师列表 getList() { teacher .getTeacherListPage(this.page, this.limit, this.teacherQuery) .then((response) => { // console.log(response); this.list = response.data.records; this.total = response.data.total; }) .catch((error) => { console.log(error); }); }, }, }; </script>
编写列表格式代码
使用element-ui表格即可
1
2
3
4
5
6
7
8
9
10
11
12
13
14
15
16
17
18
19
20
21
22
23
24
25
26
27
28
29
30
31
32
33
34
35
36
37
38
39
40
41
42
43
44
45
46
47
<template> <div class="app-container"> <!-- 表格 --> <el-table :data="list" border fit highlight-current-row> <el-table-column label="序号" width="70" header-align="center"> <template slot-scope="scope"> {{ (page - 1) * limit + scope.$index + 1 }} </template> </el-table-column> <el-table-column prop="name" label="名称" width="80" header-align="center"/> <el-table-column label="头衔" width="80" header-align="center"> <!-- 使用template slot-scope 进行判断显示 --> <template slot-scope="scope"> {{ scope.row.level === 1 ? "高级讲师" : "首席讲师" }} </template> </el-table-column> <el-table-column prop="intro" label="资历" header-align="center"/> <el-table-column prop="gmtCreate" label="添加时间" width="160" header-align="center"/> <el-table-column prop="sort" label="排序" width="60" header-align="center"/> <el-table-column label="操作" width="200" align="center"> <template slot-scope="scope"> <router-link :to="'/teacher/edit/' + scope.row.id"> <el-button type="primary" size="mini" icon="el-icon-edit" >修改</el-button > </router-link> <el-button type="danger" size="mini" icon="el-icon-delete" @click="removeDataById(scope.row.id)" >删除</el-button > </template> </el-table-column> </el-table> </div> </template>
添加分页条
使用element-ui分页即可
1
2
3
4
5
6
7
8
9
10
11
12
13
14
15
16
17
18
19
20
21
22
23
24
25
26
27
28
29
30
31
32
33
34
35
36
37
38
39
40
41
<template> <div class="app-container"> <!-- 表格 --> <!-- 分页条 --> <!-- @current-change="getList" 只需要写方法名即可,自动传入需要跳转的页数 --> <el-pagination :current-page="page" :page-size="limit" :total="total" style="padding: 30px 0; text-align: center" layout="total, prev, pager, next, jumper" @current-change="getList" /> </div> </template> <script> // 引入调用接口的js文件 import teacher from "@/api/edu/teacher.js"; export default { // …… methods: { // 获得讲师列表,page默认为1 getList(page = 1) { this.page = page; teacher .getTeacherListPage(this.page, this.limit, this.teacherQuery) .then((response) => { // console.log(response); this.list = response.data.records; this.total = response.data.total; }) .catch((error) => { console.log(error); }); }, }, }; </script>
条件查询分页
使用element-ui表单即可
1
2
3
4
5
6
7
8
9
10
11
12
13
14
15
16
17
18
19
20
21
22
23
24
25
26
27
28
29
30
31
32
33
34
35
36
37
38
39
40
41
42
43
44
45
46
47
48
49
50
51
52
53
54
55
56
57
58
59
60
61
62
63
<template> <div class="app-container"> <!--查询表单--> <el-form :inline="true" class="demo-form-inline"> <el-form-item> <el-input v-model="teacherQuery.name" placeholder="讲师名" /> </el-form-item> <el-form-item> <el-select v-model="teacherQuery.level" clearable placeholder="讲师头衔" > <el-option :value="1" label="高级讲师" /> <el-option :value="2" label="首席讲师" /> </el-select> </el-form-item> <el-form-item label="添加时间"> <el-date-picker v-model="teacherQuery.begin" type="datetime" placeholder="选择开始时间" value-format="yyyy-MM-dd HH:mm:ss" default-time="00:00:00" /> </el-form-item> <el-form-item> <el-date-picker v-model="teacherQuery.end" type="datetime" placeholder="选择截止时间" value-format="yyyy-MM-dd HH:mm:ss" default-time="00:00:00" /> </el-form-item> <el-button type="primary" icon="el-icon-search" @click="getList()" >查询</el-button > <el-button type="default" @click="resetData()">清空</el-button> </el-form> </template> <script> // 引入调用接口的js文件 import teacher from "@/api/edu/teacher.js"; export default { methods: { // 获得讲师列表,page默认为1 getList(page = 1) { }, //清空表单输入项数据 resetData() { this.teacherQuery = {}; //查询所有讲师数据 this.getList(); }, }, }; </script>
删除讲师 添加页面结构按钮
记得绑定对应方法名
slot插槽,Vue - slot-scope=”scope” 的意义 - 武卡卡 - 博客园 (cnblogs.com)
1
2
3
4
5
6
7
8
9
10
11
12
13
14
15
16
17
18
19
<el-table-column label="操作" width="200" align="center"> <template slot-scope="scope"> <router-link :to="'/teacher/edit/' + scope.row.id"> <el-button type="primary" size="mini" icon="el-icon-edit" >修改</el-button > </router-link> <el-button type="danger" size="mini" icon="el-icon-delete" @click="removeDataById(scope.row.id)" >删除</el-button > </template> </el-table-column>
编写接口调用方法
先去api文件夹下编写调用接口的方法 teacher.js
1
2
3
4
5
6
7
8
9
10
11
12
13
import request from '@/utils/request' export default { deleteTeacherById (id ) return request({ url : `/eduservice/teacher/${id} ` , method : 'delete' , }) } }
编写按钮对应方法
编写按钮对应方法,考虑到用户体验,添加element-ui弹框提示
1
2
3
4
5
6
7
8
9
10
11
12
13
14
15
16
17
18
19
20
21
22
23
24
25
26
27
28
29
30
31
32
removeDataById (id ) this .$confirm('此操作将永久删除该讲师记录, 是否继续?' , '提示' , { confirmButtonText : '确定' , cancelButtonText : '取消' , type : 'warning' }) .then(() => { teacher .deleteTeacherById(id) .then(response => this .$message({ type : 'success' , message : '删除成功!' }) if (this .total - (this .page - 1 ) * this .limit == 1 ) { this .getList(this .page - 1 ) } else { this .getList(this .page) } }) }) .catch(() => { this .$message({ type : 'info' , message : '已取消删除' }) }) }
当前项目结构
添加讲师 添加页面结构
src\views\edu\teacher\save.vue
1
2
3
4
5
6
7
8
9
10
11
12
13
14
15
16
17
18
19
20
21
22
23
24
25
26
27
28
29
30
31
32
33
34
35
36
37
38
39
40
41
42
43
44
45
46
47
48
49
50
51
52
53
54
55
56
57
58
59
60
61
62
63
64
65
66
67
68
69
70
71
<template> <div class="app-container"> <div class="app-container"> <el-form label-width="120px"> <el-form-item label="讲师名称"> <el-input v-model="teacher.name" /> </el-form-item> <el-form-item label="讲师排序"> <el-input-number v-model="teacher.sort" controls-position="right" min="0" /> </el-form-item> <el-form-item label="讲师头衔"> <el-select v-model="teacher.level" clearable placeholder="请选择" > <el-option :value="1" label="高级讲师" /> <el-option :value="2" label="首席讲师" /> </el-select> </el-form-item> <el-form-item label="讲师资历"> <el-input v-model="teacher.career" /> </el-form-item> <el-form-item label="讲师简介"> <el-input v-model="teacher.intro" :rows="10" type="textarea" /> </el-form-item> <!-- 讲师头像:TODO --> <el-form-item> <el-button :disabled="saveBtnDisabled" type="primary" @click="saveOrUpdate" >保存</el-button > </el-form-item> </el-form> </div> </div> </template> <script> // 引入调用接口的js文件 import teacherApi from '@/api/edu/teacher.js' export default { data() { return { teacher: { name: '', sort: 0, level: 1, career: '', intro: '', avatar: '' }, saveBtnDisabled: false } }, created() {}, methods: {} } </script>
编写接口调用方法 1 2 3 4 5 6 7 8 addTeacher (teacher ) return request({ url : `/eduservice/teacher/addTeacher` , method : 'post' , data : teacher }) }
编写按钮对应方法 1 2 3 4 5 6 7 8 9 10 11 12 13 14 15 16 17 18 19 20 21 22 23 24 25 26 27 28 29 30 31 32 33 34 35 36 37 38 <script> // 引入调用接口的js文件 import teacherApi from '@/api/edu/teacher.js' export default { data() { return { teacher: { name: '', sort: 0, level: 1, career: '', intro: '', avatar: '' }, saveBtnDisabled: false } }, created() {}, methods: { // 添加和修改使用同一个页面 saveOrUpdate() { this.saveTeacher() }, saveTeacher() { teacherApi.addTeacher(this.teacher).then(response => { // 显示提示信息 this.$message({ type: 'success', message: '添加成功!' }) // 路由跳转到列表页面 this.$router.push({ path: '/teacher/list' }) }) } } } </script>
优化讲师列表排序
根据添加时间降序
1 2 3 4 5 6 7 8 9 10 11 12 13 14 15 @ApiOperation("多条件组合分页") @PostMapping("pageTeacherCondition/{current}/{limit}") public R pageListTeacherCondition (@PathVariable long current, @PathVariable long limit, @RequestBody(required = false) TeacherQuery teacherQuery) wrapper.orderByDesc("gmt_create" ); teacherService.page(pageTeacher, wrapper); }
修改讲师 编写页面结构 1 2 3 4 5 6 7 8 9 10 11 12 13 14 15 16 17 18 19 20 <el-table-column label="操作" width="200" align="center"> <template slot-scope="scope"> <!-- router跳转 --> <router-link :to="'/teacher/edit/' + scope.row.id"> <el-button type="primary" size="mini" icon="el-icon-edit" >修改</el-button > </router-link> <el-button type="danger" size="mini" icon="el-icon-delete" @click="removeDataById(scope.row.id)" >删除</el-button > </template> </el-table-column>
隐藏路由
此处需要额外添加router,且不显示
1 2 3 4 5 6 7 8 9 10 11 12 13 14 15 16 17 18 19 20 21 22 23 24 25 26 27 28 29 30 31 32 33 export const constantRouterMap = [{ path : '/teacher' , component : Layout, redirect : '/teacher/table' , name : '讲师管理' , meta : { title : '讲师管理' , icon : 'example' }, children : [ { path : 'list' , name : '讲师列表' , component : () => import ('@/views/edu/teacher/list' ), meta : { title : '讲师列表' , icon : 'table' } }, { path : 'save' , name : '添加讲师' , component : () => import ('@/views/edu/teacher/save' ), meta : { title : '添加讲师' , icon : 'tree' } }, { path : 'edit/:id' , name : 'EduTeacherEdit' , component : () => import ('@/views/edu/teacher/save' ), meta : { title : '编辑讲师' , icon : 'tree' }, hidden : true } ] }, ]
数据回显
编写后端接口调用方法
1 2 3 4 5 6 7 getTeacherInfo (id ) return request({ url : `/eduservice/teacher/getTeacher/${id} ` , method : 'get' , }) }
编写调用该方法,注意要在需要显示该信息的组件中调用该方法
1 2 3 4 5 6 7 8 9 10 11 12 13 14 15 16 17 18 19 20 <script> export default { created() { // 判断当前路径是否含有id,有则为修改,否则为添加 if (this.$route.params && this.$route.params.id) { // 从路径中获取参数值 const id = this.$route.params.id this.getTeacherInfo(id) } }, methods: { // 根据id获得讲师信息 getTeacherInfo(id) { teacherApi.getTeacherInfo(id).then(response => { this.teacher = response.data.teacher }) } } } </script>
保存修改
编写后端接口调用方法
1 2 3 4 5 6 7 8 updateTeacher (teacher ) return request({ url : `/eduservice/teacher/updateTeacher` , method : 'post' , data : teacher }) }
页面调用该方法,需要判断是修改还是添加
1 2 3 4 5 6 7 8 9 10 11 12 13 14 15 16 17 18 19 20 21 22 23 24 25 26 27 <script> export default { methods: { // 添加和修改使用同一个页面 saveOrUpdate() { // 判断是否有id if (this.teacher.id) { this.updateTeacher() } else { this.saveTeacher() } }, // 修改讲师信息 updateTeacher() { teacherApi.updateTeacher(this.teacher).then(response => { // 显示提示信息 this.$message({ type: 'success', message: '修改成功!' }) // 路由跳转到列表页面 this.$router.push({ path: '/teacher/list' }) }) } } } </script>
路由切换存留信息问题
感谢弹幕提醒,使用监听路由的方法,可以防止当点击修改后在edit页面再次点击添加讲师,显示后的页面仍然留存讲师信息的小问题
1 2 3 4 5 6 7 8 9 10 11 12 13 14 15 16 17 18 19 20 21 22 23 24 25 26 <script> export default { // 监听 watch: { // 监听路由是否发生了变化,如果是则清除当前页面的数据 $route: { handler: function(val, oldVal) { this.resetData() } } }, methods: { // 清空数据 resetData() { this.teacher = { name: '', sort: 0, level: 1, career: '', intro: '', avatar: '' } } } } </script>
好吧原来下一集就把这个问题解决了,原因是多次跳转至同一个页面created钩子函数只会执行一次
以下是老师的方案
1 2 3 4 5 6 7 8 9 10 11 12 13 14 15 16 17 18 19 20 21 22 23 24 25 26 27 28 29 30 31 32 33 34 35 <script> export default { // 监听 watch: { // 监听路由是否发生了变化,如果是则清除当前页面的数据 $route(to, from) { this.init() } }, created() { // 这里可以不用调用初始化方法,已经设置了监听 this.init() }, methods: { // 初始化 init() { // 判断当前路径是否含有id,有则为修改,否则为添加 if (this.$route.params && this.$route.params.id) { // 从路径中获取参数值 const id = this.$route.params.id this.getTeacherInfo(id) } else { this.teacher = { name: '', sort: 0, level: 1, career: '', intro: '', avatar: '' } } } } } </script>
nginx
反向代理服务器,功能如下:
请求转发
负载均衡
动静分离
基础命令
启动:nginx.exe
关闭:nginx.exe -s stop
重启:nginx.exe -s reload
配置
nginx.conf文件中配置
修改第一个server下的listen端口号 -> 81 (最好改一下)
添加自己的server,其中listen监听的端口号要和前端config中的端口号(BASE_PATH)对应
例如相当于访问9001下的xxx,就会转发到8001下的xxx或者其他
1 2 3 4 5 6 7 8 9 10 11 12 13 14 server { listen 9001; server_name localhost; location ~ /eduservice/ { proxy_pass http://localhost:8001; } location ~ /eduoss/ { proxy_pass http://localhost:8002; } location ~ /eduvod/ { proxy_pass http://localhost:8003; } }
记得修改前端中的BASE_PATH和监听端口一致
测试
application和npm都打开,前端测试一下,查看network中的header是否为nginx中的监听端口号
上传头像功能(后端+前端) 阿里云OSS
简单来说:解决海量数据存储与弹性扩容
简单入门
开通就能进控制台了
创建bucket
文件管理中可以进行上传文件等操作
创建access key获得id和秘钥
小小的吐槽:当天给我的账户里充了1rmb(巨额,确信),配置了一些OSS的东西,第二天就来了个专属客服打电话给我,向我介绍各种产品(上次刚注册的时候也给我打了电话,里面的小姐姐说话都好好听)服务太热情了!
后端阿里云OSS搭建
去官方文档查看详细介绍
快速入门 (aliyun.com)
创建对应子模块
service模块 -> service_oss子模块即可
引入依赖 1 2 3 4 5 6 7 8 9 10 11 12 13 <dependencies > <dependency > <groupId > com.aliyun.oss</groupId > <artifactId > aliyun-sdk-oss</artifactId > </dependency > <dependency > <groupId > joda-time</groupId > <artifactId > joda-time</artifactId > </dependency > </dependencies >
配置application.properties
aliyun.oss.file后配置阿里云OSS和AccessKey相关信息
1 2 3 4 5 6 7 server.port =8002 spring.application.name =service-oss spring.profiles.active =dev aliyun.oss.file.endpoint =oss-cn-beijing.aliyuncs.com aliyun.oss.file.keyid =aliyun.oss.file.keysecret =aliyun.oss.file.bucketname =demo-edu-guli
创建启动类 1 2 3 4 5 6 7 8 9 10 11 12 13 package com.atguigu.oss;import org.springframework.boot.SpringApplication;import org.springframework.boot.autoconfigure.SpringBootApplication;import org.springframework.context.annotation.ComponentScan;@SpringBootApplication @ComponentScan(basePackages = {"com.atguigu"}) public class OssApplication public static void main (String[] args) SpringApplication.run(OssApplication.class, args); } }
由于只使用上传的功能,所以不需要操作数据库,需要配置默认不加载数据库(否则会报错)
1 @SpringBootApplication(exclude = DataSourceAutoConfiguration.class)
编写常量类
用于获取配置文件中的常量
1 2 3 4 5 6 7 8 9 10 11 12 13 14 15 16 17 18 19 20 21 22 23 24 25 26 27 28 29 30 31 32 33 package com.atguigu.oss.utils;import org.springframework.beans.factory.InitializingBean;import org.springframework.beans.factory.annotation.Value;import org.springframework.stereotype.Component;@Component public class ConstantPropertiesUtils implements InitializingBean @Value("${aliyun.oss.file.endpoint}") private String endpoint; @Value("${aliyun.oss.file.keyid}") private String keyid; @Value("${aliyun.oss.file.keysecret}") private String keysecret; @Value("${aliyun.oss.file.bucketname}") private String bucketname; public static String END_POINT; public static String ACCESS_KEY_ID; public static String ACCESS_KEY_SECRET; public static String BUCKET_NAME; @Override public void afterPropertiesSet () throws Exception END_POINT = endpoint; ACCESS_KEY_ID = keyid; ACCESS_KEY_SECRET = keysecret; BUCKET_NAME = bucketname; } }
编写Controller
实现文件获取和回传url和页面跳转
1 2 3 4 5 6 7 8 9 10 11 12 13 14 15 16 17 18 19 20 21 22 23 24 25 26 27 package com.atguigu.oss.controller;import com.atguigu.commonutils.R;import com.atguigu.oss.service.OssService;import org.springframework.beans.factory.annotation.Autowired;import org.springframework.web.bind.annotation.PostMapping;import org.springframework.web.bind.annotation.RequestMapping;import org.springframework.web.bind.annotation.RestController;import org.springframework.web.multipart.MultipartFile;@RestController @RequestMapping("/eduoss/fileoss") @CrossOrigin public class OssController @Autowired private OssService ossService; @PostMapping() public R uploadOssFile (MultipartFile file) String url = ossService.uploadFileAvatar(file); return R.ok().data("url" , url); } }
主要业务逻辑编写 编写Service实现类
先创建接口和实现类,实现类中实现上传业务
1 2 3 4 5 6 7 8 9 10 11 12 13 14 15 16 17 18 19 20 21 22 23 24 25 26 27 28 29 30 31 32 33 34 35 36 37 38 39 40 41 package com.atguigu.oss.service.impl;import com.aliyun.oss.OSS;import com.aliyun.oss.OSSClientBuilder;import com.atguigu.oss.service.OssService;import com.atguigu.oss.utils.ConstantPropertiesUtils;import org.springframework.stereotype.Service;import org.springframework.web.multipart.MultipartFile;import java.io.IOException;@Service public class OssServiceImpl implements OssService @Override public String uploadFileAvatar (MultipartFile file) String endpoint = ConstantPropertiesUtils.END_POINT; String accessKeyId = ConstantPropertiesUtils.ACCESS_KEY_ID; String accessKeySecret = ConstantPropertiesUtils.ACCESS_KEY_SECRET; String bucketName = ConstantPropertiesUtils.BUCKET_NAME; String fileName = file.getOriginalFilename(); OSS ossClient = new OSSClientBuilder().build(endpoint, accessKeyId, accessKeySecret); try { ossClient.putObject(bucketName, fileName, file.getInputStream()); String url = "https://" + bucketName + "." + endpoint + "/" + fileName; return url; } catch (IOException e) { e.printStackTrace(); return null ; } finally { ossClient.shutdown(); } } }
完善Service
防止文件名重复
1 2 3 4 5 6 String uuid = UUID.randomUUID().toString().replaceAll("-" , "" ); fileName = uuid + fileName; String datePath = new DateTime().toString("yyyy/MM/dd" ); fileName = datePath + "/" + fileName;
上传头像功能(前端) 添加页面结构
element-UI里有相关组件(ImageCropper、PanThumb),cv即可
注意要把组件复制到conponents里
注意修改image-cropper中绑定的url、filed中属性值要与后端接口方法中参数名对应
在添加讲师的页面添加如下标签及代码
1 2 3 4 5 6 7 8 9 10 11 12 13 14 15 16 17 18 19 20 21 22 23 24 25 26 27 28 29 30 31 32 33 34 35 36 37 38 39 40 41 42 43 44 45 46 47 48 49 50 51 52 53 54 55 56 57 58 59 60 61 62 63 64 65 66 <template> <div class="app-container"> <div class="app-container"> <el-form label-width="120px"> <!-- 讲师头像 --> <el-form-item label="讲师头像"> <!-- 头衔缩略图 --> <pan-thumb :image="teacher.avatar" /> <!-- 文件上传按钮 --> <el-button type="primary" icon="el-icon-upload" @click="imagecropperShow = true" >更换头像 </el-button> <!-- v-show:是否显示上传组件 :key:类似于id,如果一个页面多个图片上传控件,可以做区分 :url:后台上传的url地址 @close:关闭上传组件 @crop-upload-success:上传成功后的回调 <input type="file" name="file"/> --> <image-cropper v-show="imagecropperShow" :width="300" :height="300" :key="imagecropperKey" :url="BASE_API + '/eduoss/fileoss'" field="file" @close="close" @crop-upload-success="cropSuccess" /> </el-form-item> </el-form> </div> </div> </template> <script> // 上传头像所需组件 import ImageCropper from '@/components/ImageCropper' import PanThumb from '@/components/PanThumb' export default { // 声明组件 components: { ImageCropper, PanThumb }, data() { return { // 上传弹框组件是否显示 imagecropperShow: false, // 上传组件key值 imagecropperKey: 0, // 获取接口API,固定写法 BASE_API: process.env.BASE_API } }, methods: { // 关闭上传弹框 close() {}, // 上传成功 cropSuccess() {} } } </script>
使用组件
import以及声明即可
1 2 3 4 5 6 7 8 9 <script> // 上传头像所需组件 import ImageCropper from '@/components/ImageCropper' import PanThumb from '@/components/PanThumb' export default { // 声明组件 components: { ImageCropper, PanThumb }, } </script>
编写按钮方法 1 2 3 4 5 6 7 8 9 10 11 close ( this .imagecropperShow = false this .imagecropperKey = this .imagecropperKey + 1 }, cropSuccess (data ) this .teacher.avatar = data.url this .close() }
测试,报错与解决✅
报了一个错,显示上传失败,去看network里的请求URL里的地址不对,中间多了一个undefined,想到可能变量名写错了,稍微对比了一下,BASE_API写成BASE_PATH了,改了就可以了
课程分类管理模块(后端+前端)
记得先导入数据库
添加使用上传excel文件的形式
EasyExcel入门
EasyExcel · 语雀 (yuque.com)
记得引入依赖坐标,同时需要poi的,不过父模块已经引入了
1 2 3 4 5 6 7 8 9 10 11 12 13 14 15 16 17 18 19 20 21 22 23 24 25 26 <dependencies > <dependency > <groupId > com.alibaba</groupId > <artifactId > easyexcel</artifactId > <version > 2.1.1</version > </dependency > </dependencies > <dependency > <groupId > org.apache.poi</groupId > <artifactId > poi</artifactId > </dependency > <dependency > <groupId > org.apache.poi</groupId > <artifactId > poi-ooxml</artifactId > </dependency > <dependency > <groupId > commons-fileupload</groupId > <artifactId > commons-fileupload</artifactId > </dependency >
写Excel
先创建实体类(一级分类、二级分类)
属性需要全小写
1 2 3 4 5 6 7 8 @Data public class DemoData @ExcelProperty("学生编号") private Integer sno; @ExcelProperty("学生姓名") private String sname; }
测试代码
1 2 3 4 5 6 7 8 9 10 11 12 13 14 15 16 17 18 19 20 21 22 public class TestEasyExcel public static void main (String[] args) String filename = "D:\\MyProject\\excel\\test.xlsx" ; EasyExcel.write(filename, DemoData.class).sheet("学生列表" ).doWrite(getData()); } private static List<DemoData> getData () List<DemoData> list = new ArrayList<>(); for (int i = 0 ; i < 10 ; i++) { DemoData data = new DemoData(); data.setSname("aaa" + i); data.setSno(i); list.add(data); } return list; } }
读Excel
稍微修改一下实体类
1 2 3 4 5 6 7 8 @Data public class DemoData @ExcelProperty(value = "学生编号", index = 0) private Integer sno; @ExcelProperty(value = "学生姓名", index = 1) private String sname; }
创建监听器对excel文件的读取(一行一行的读取需要)
1 2 3 4 5 6 7 8 9 10 11 12 13 14 15 16 17 18 19 20 public class ExcelListener extends AnalysisEventListener <DemoData > @Override public void invoke (DemoData demoData, AnalysisContext analysisContext) System.out.println("*****" + demoData + "*****" ); } @Override public void doAfterAllAnalysed (AnalysisContext analysisContext) } @Override public void invokeHeadMap (Map<Integer, String> headMap, AnalysisContext context) System.out.println("表头:" + headMap); } }
测试代码
1 2 String filename = "D:\\MyProject\\excel\\test.xlsx" ; EasyExcel.read(filename, DemoData.class, new ExcelListener()).sheet().doRead();
代码生成器
先生成entity、service、mapper、controller再说
操作还是一样,详细代码见1,只需要修改表名运行即可
1 2 strategy.setInclude("edu_subject" );
记得为自动生成的实体类添加自动填充(@TableField(fill = FieldFill.INSERT)等)的注解
注意controller添加注释@CrossOrigin解决跨域
添加课程分类(后端) 创建表格实体类 1 2 3 4 5 6 7 8 9 10 11 12 13 @Data public class SubjectData @ExcelProperty(index = 0) private String oneSubjectName; @ExcelProperty(index = 1) private String twoSubjectName; }
编写service 1 2 3 4 5 6 7 8 9 10 11 12 13 14 15 @Service public class EduSubjectServiceImpl extends ServiceImpl <EduSubjectMapper , EduSubject > implements EduSubjectService @Override public void saveSubject (MultipartFile file) try { InputStream inputStream = file.getInputStream(); EasyExcel.read(inputStream, SubjectData.class, new SubjectExcelListener()).sheet().doRead(); } catch (Exception e) { e.printStackTrace(); } } }
编写监听器
注意DataListener 不能被spring管理(官方说的),如果使用spring需要使用特定构造器
1 2 3 4 5 6 7 8 9 10 11 12 13 14 15 16 17 18 19 20 21 22 23 24 25 26 27 28 29 30 31 32 33 34 35 36 37 38 39 40 41 42 43 44 45 46 47 48 49 50 51 52 53 54 55 56 57 58 59 60 61 62 63 64 65 package com.atguigu.eduservice.listener;import com.alibaba.excel.context.AnalysisContext;import com.alibaba.excel.event.AnalysisEventListener;import com.atguigu.eduservice.entity.EduSubject;import com.atguigu.eduservice.entity.excel.SubjectData;import com.atguigu.eduservice.service.EduSubjectService;import com.atguigu.servicebase.ExceptionHandler.GuliException;import com.baomidou.mybatisplus.core.conditions.query.QueryWrapper;public class SubjectExcelListener extends AnalysisEventListener <SubjectData > public EduSubjectService subjectService; public SubjectExcelListener () } public SubjectExcelListener (EduSubjectService subjectService) this .subjectService = subjectService; } @Override public void invoke (SubjectData subjectData, AnalysisContext analysisContext) if (subjectData == null ) { throw new GuliException(20001 , "文件数据为空" ); } EduSubject existOneSubject = this .existSubject(subjectData.getOneSubjectName(), "0" ); if (existOneSubject == null ) { EduSubject eduSubject = new EduSubject(); eduSubject.setParentId("0" ); eduSubject.setTitle(subjectData.getOneSubjectName()); subjectService.save(eduSubject); } else { EduSubject eduTwoSubject = this .existSubject(subjectData.getTwoSubjectName(), existOneSubject.getId()); if (eduTwoSubject == null ) { EduSubject eduSubject = new EduSubject(); eduSubject.setParentId(existOneSubject.getId()); eduSubject.setTitle(subjectData.getTwoSubjectName()); subjectService.save(eduSubject); } } } @Override public void doAfterAllAnalysed (AnalysisContext analysisContext) } public EduSubject existSubject (String title, String pid) QueryWrapper<EduSubject> wrapper = new QueryWrapper<>(); wrapper.eq("title" , title); wrapper.eq("parent_id" , pid); return subjectService.getOne(wrapper); } }
同时修改一下service中方法的参数
其实这里有点奇怪,listener做了主要业务逻辑,等做完了再试试别的方法
编写controller 1 2 3 4 5 6 7 8 9 10 11 12 13 14 15 16 17 @RestController @RequestMapping("/eduservice/subject") @CrossOrigin public class EduSubjectController @Autowired private EduSubjectService subjectService; @PostMapping("addSubject") public R addSubject (MultipartFile file) subjectService.saveSubject(file, subjectService); return R.ok(); } }
测试,报错与解决✅
swagger成功,后台报错,看了下说gtm_time没有默认值,然后想到自动注入可能没加,果然。
然后是能够写入数据库了但是一级写到二级去了,看了下是添加二级分类的时候的get方法成getOneSubjectName而不是getTwoSubjectName,改一下就解决了
添加课程分类(前端) 配置router
src -> router -> index.js 当中添加即可
1 2 3 4 5 6 7 8 9 10 11 12 13 14 15 16 17 18 19 20 21 22 { path : '/subject' , component : Layout, redirect : '/subject/list' , name : '课程分类管理' , meta : { title : '课程分类管理' , icon : 'example' }, children : [ { path : 'list' , name : '课程分类列表' , component : () => import ('@/views/edu/subject/list' ), meta : { title : '课程分类列表' , icon : 'tree' } }, { path : 'save' , name : '添加课程分类' , component : () => import ('@/views/edu/subject/add' ), meta : { title : '添加课程分类' , icon : 'table' } }, ] },
编写添加课程分类视图
element-ui 中 cv一下(文件上传相关)
1 2 3 4 5 6 7 8 9 10 11 12 13 14 15 16 17 18 19 20 21 22 23 24 25 26 27 28 29 30 31 32 33 34 35 36 37 38 39 40 41 42 43 44 45 46 47 48 49 50 51 52 53 54 <template> <div class="app-container"> <el-form label-width="120px"> <el-form-item label="信息描述"> <el-tag type="info">excel模版说明</el-tag> <el-tag> <i class="el-icon-download" /> <!-- 这里模板放在了本地static文件夹里,也可以放在OSS当中 --> <a :href="'/static/demo.xlsx'">点击下载模版</a> </el-tag> </el-form-item> <el-form-item label="选择Excel"> <el-upload ref="upload" :auto-upload="false" :on-success="fileUploadSuccess" :on-error="fileUploadError" :disabled="importBtnDisabled" :limit="1" :action="BASE_API + '/eduservice/subject/addSubject'" name="file" accept="application/vnd.ms-excel" > <el-button slot="trigger" size="small" type="primary" >选取文件</el-button > <el-button :loading="loading" style="margin-left: 10px" size="small" type="success" @click="submitUpload" >上传到服务器</el-button > </el-upload> </el-form-item> </el-form> </div> </template> <script> export default { data() { return { BASE_API: process.env.BASE_API, // 接口API地址 OSS_PATH: process.env.OSS_PATH, // 阿里云OSS地址 importBtnDisabled: false, // 按钮是否禁用, loading: false } }, created() {}, methods: {} } </script>
编写调用方法 1 2 3 4 5 6 7 8 9 10 11 12 13 14 15 16 17 18 19 20 21 22 23 24 25 methods: { submitUpload ( this .importBtnDisabled = true this .loading = true this .$refs.upload.submit() }, fileUploadSuccess ( this .loading = false this .$message({ type : 'success' , message : '添加课程分类成功!' }) }, fileUploadError ( this .loading = false this .$message({ type : 'success' , message : '添加课程分类失败!' }) } }
完善
el-upload添加一个 :before-upload=”beforeUpload”,用于上传前判断文件后缀格式
上传文件时判断文件是否为空
1 2 3 4 5 6 7 8 9 10 11 12 13 14 15 16 17 18 19 20 21 22 23 24 25 26 27 28 29 30 31 32 33 34 35 36 37 38 39 40 41 42 43 44 45 46 47 48 49 50 51 52 53 54 55 56 57 58 59 60 61 62 63 64 65 66 <template> <div class="app-container"> <el-form label-width="120px"> <el-form-item label="选择Excel"> <el-upload ref="upload" :auto-upload="true" :before-upload="beforeUpload" :on-success="fileUploadSuccess" :on-error="fileUploadError" :disabled="importBtnDisabled" :limit="1" :action="BASE_API + '/eduservice/subject/addSubject'" name="file" accept="application.xlsx" > <el-button slot="trigger" size="small" type="primary" >选取文件</el-button > <el-button :loading="loading" style="margin-left: 10px" size="small" type="success" @click="submitUpload" >上传到服务器</el-button > </el-upload> </el-form-item> </el-form> </div> </template> <script> export default { methods: { // 上传前判断格式 beforeUpload() { const fileName = this.$refs.upload.uploadFiles[0].name const suffix = fileName.substring(fileName.lastIndexOf('.') + 1) if (suffix != 'xlsx') { this.fileSuffixError() return false } }, // 上传文件 submitUpload() { if (this.$refs.upload.uploadFiles.length == 0) { this.fileUploadError() return } this.importBtnDisabled = true this.loading = true // 使用vue的提交,而不是Ajax请求 this.$refs.upload.submit() }, // 文件格式错误失败 fileSuffixError() { this.loading = false this.$message({ type: 'error', message: '文件格式错误!' }) } } } </script>
课程分类列表(后端) 针对返回的数据创建对应实体类
一级分类、二级分类都要创建对应实体类
1 2 3 4 5 6 7 @Data public class OneSubject private String id; private String title; private List<TwoSubject> children = new ArrayList<>(); }
1 2 3 4 5 6 @Data public class TwoSubject private String id; private String title; }
编写controller 1 2 3 4 5 6 @GetMapping("getAllSubjects") public R getAllSubjects () List<OneSubject> list = subjectService.getAllSubjects(); return R.ok().data("list" , "list" ); }
编写service
service继承的ServiceImpl已经自动注入了baseMapper
这里的代码不够优雅
1 2 3 4 5 6 7 8 9 10 11 12 13 14 15 16 17 18 19 20 21 22 23 24 25 26 27 28 29 30 31 32 33 34 35 36 37 38 39 40 41 @Override public List<OneSubject> getAllSubjects () QueryWrapper<EduSubject> wrapperOne = new QueryWrapper<>(); wrapperOne.eq("parent_id" , "0" ); List<EduSubject> oneSubjectList = baseMapper.selectList(wrapperOne); QueryWrapper<EduSubject> wrapperTwo = new QueryWrapper<>(); wrapperTwo.ne("parent_id" , "0" ); List<EduSubject> twoSubjectList = baseMapper.selectList(wrapperTwo); List<OneSubject> finalList = new ArrayList<>(); for (int i = 0 ; i < oneSubjectList.size(); i++) { EduSubject eduSubjectOne = oneSubjectList.get(i); OneSubject oneSubject = new OneSubject(); BeanUtils.copyProperties(eduSubjectOne, oneSubject); finalList.add(oneSubject); List<TwoSubject> childrenList = new ArrayList<>(); for (int m = 0 ; m < twoSubjectList.size(); m++) { EduSubject eduSubjectTwo = twoSubjectList.get(m); if (eduSubjectTwo.getParentId().equals(eduSubjectOne.getId())) { TwoSubject twoSubject = new TwoSubject(); BeanUtils.copyProperties(eduSubjectTwo, twoSubject); childrenList.add(twoSubject); } } oneSubject.setChildren(childrenList); } return finalList; }
课程分类列表(前端) 树形结构模板 1 2 3 4 5 6 7 8 9 10 11 12 13 14 15 16 17 18 19 20 21 22 23 24 25 26 27 28 29 30 31 32 33 34 35 36 37 38 39 40 41 42 43 44 45 46 47 48 49 50 51 52 53 54 55 56 57 58 59 60 61 62 63 64 65 66 67 68 69 70 71 72 73 74 75 76 77 78 79 80 81 82 83 84 85 86 87 88 89 90 91 92 93 94 95 <template> <div class="app-container"> <!-- 检索 --> <el-input v-model="filterText" placeholder="Filter keyword" style="margin-bottom: 30px" /> <!-- 树形结构 --> <el-tree ref="tree2" :data="data2" :props="defaultProps" :filter-node-method="filterNode" class="filter-tree" default-expand-all /> </div> </template> <script> export default { data() { return { filterText: '', data2: [ { id: 1, label: 'Level one 1', children: [ { id: 4, label: 'Level two 1-1', children: [ { id: 9, label: 'Level three 1-1-1' }, { id: 10, label: 'Level three 1-1-2' } ] } ] }, { id: 2, label: 'Level one 2', children: [ { id: 5, label: 'Level two 2-1' }, { id: 6, label: 'Level two 2-2' } ] }, { id: 3, label: 'Level one 3', children: [ { id: 7, label: 'Level two 3-1' }, { id: 8, label: 'Level two 3-2' } ] } ], defaultProps: { children: 'children', label: 'label' } } }, watch: { filterText(val) { this.$refs.tree2.filter(val) } }, methods: { filterNode(value, data) { if (!value) return true return data.label.indexOf(value) !== -1 } } } </script>
需要稍微修改
后端接口调用
api -> edu -> subject.js
1 2 3 4 5 6 7 8 9 10 11 12 13 import request from '@/utils/request' export default { getSubjectList ( return request({ url : `/eduservice/subject/getAllSubjects` , method : 'get' }) } }
记得在vue视图中引入
vue视图和方法 1 2 3 4 5 6 7 8 9 10 11 12 13 14 15 16 17 18 19 20 21 22 23 24 25 26 27 28 29 30 31 32 33 34 35 36 37 38 39 40 41 42 43 44 45 46 47 48 49 50 51 52 53 54 55 56 57 58 <template> <div class="app-container"> <!-- 检索 --> <el-input v-model="filterText" placeholder="Filter keyword" style="margin-bottom: 30px" /> <!-- 树形结构 --> <el-tree ref="tree2" :data="list" :props="defaultProps" :filter-node-method="filterNode" class="filter-tree" default-expand-all /> </div> </template> <script> // 引入调用接口的js文件 import subjectApi from '@/api/edu/subject.js' export default { data() { return { // 索引文本 filterText: '', list: [], defaultProps: { children: 'children', label: 'title' } } }, watch: { filterText(val) { this.$refs.tree2.filter(val) } }, created() { this.getAllSubjectList() }, methods: { // 获得所有subject getAllSubjectList() { subjectApi.getSubjectList().then(result => { this.list = result.data.list }) }, // 过滤文本(不区分大小写) filterNode(value, data) { if (!value) return true return data.title.toLowerCase().indexOf(value.toLowerCase()) !== -1 } } } </script>
测试
记得开nginx
待续
进度1/3