
什么是Spring
Spring用来干什么
Spring是一个支持快速开发Java EE应用程序的框架。它提供了一系列底层容器和基础设施,并可以和大量常用的开源框架无缝集成。
Spring是分层的 Java SE/EE应用 full-stack轻量级开源框架,以loC(Inverse of Control:反转控制)和Aop(Aspect Oriented Programming:面向切面编程)为内核。
提供了展现层 Spring MVC和持久层 Spring JDBCTemplate以及业务层事务管理等众多的企业级应用技术,还能整合开源世界众多著名的第三方框架和类库,逐渐成为使用最多的 Java EE企业应用开源框架。
Spring发展历程
1997年,BM提出了EB的思想
1998年,SUN制定开发标准规范E丿B1.0
1999年,EB1.1发布
2001年,EB2.0发布
2003年,EB2.1发布
2006年,EB3.0发布
Spring之父
Rod Johnson( Spring之父)
《Expert One-to-One J2EE Design and development(2002)》
阐述了J2EE使用EB开发设计的优点及解决方案
《Expert One-to-One J2EE Development without EJB(2004)》
阐述了2E开发不使用EB的解决方式( Spring维形)
Spring的优势
- 方便解耦,简化开发
- 通过 Spring提供的loC容器,可以将对象间的依赖关系交由 Spring进行控制,避免硬编码所造成的过度耦合。
- 用户也不必再为单例模式类、属性文件解析等这些很底层的需求编写代码,可以更专注于上层的应用。
- AOP编程的支持
- 通过 Spring的AOP功能,方便进行面向切面编程,许多不容易用传统OOP实现的功能可以通过AOP轻松实现。
- 声明式事务的支持
- 可以将我们从单调烦闷的事务管理代码中解脱出来,通过声明式方式灵活的进行事务管理,提高发效率和质量。
- 方便程序的测试
- 可以用非容器依赖的编程方式进行几乎所有的测试工作,测试不再是昂贵的操作,而是随手可做的事情。
- 方便集成各种优秀框架
- Spring对各种优秀框架( Struts、 Hibernate、 Hessian、Quartz等)的支持。
- 降低 JavaEE AP的使用难度
- Spring对 JavaEE API(如JDBC、 JavaMail、远程调用等)进行了薄薄的封装层,使这些APl的使用难度大为降低。
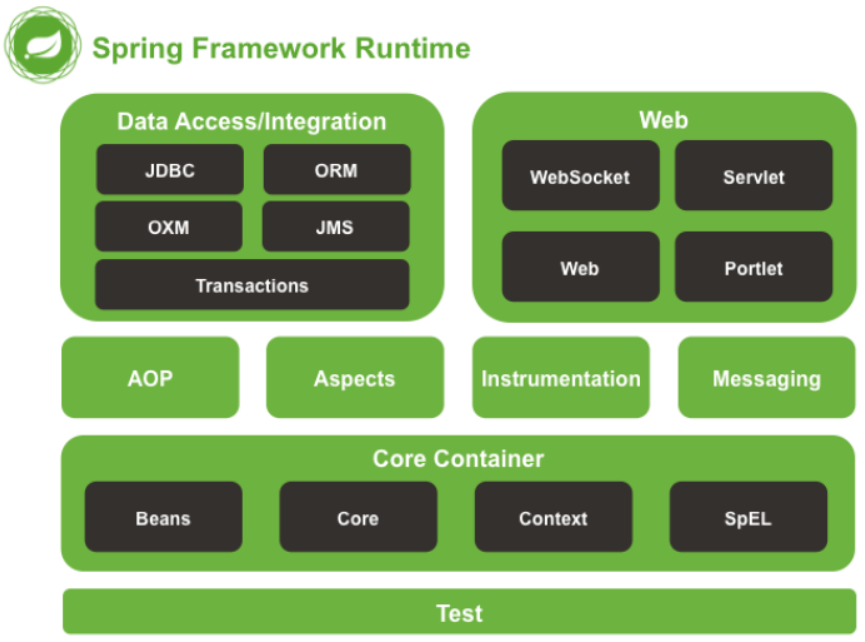
Spring体系结构
Spring快速开发步骤
导入maven依赖
1
2
3
4
5
6
7<dependencies>
<dependency>
<groupId>org.springframework</groupId>
<artifactId>spring-context</artifactId>
<version>5.2.8.RELEASE</version>
</dependency>
</dependencies>创建Spring conf配置文件(通常命名为applicationContext)
配置如下
1
<bean id="userDao" class="com.myspring.dao.impl.UserDaoImpl"></bean>
实现
1
2
3
4
5
6
7
public class UserDaoDemo {
public static void main(String[] args) {
ApplicationContext app = new ClassPathXmlApplicationContext("applicationContext.xml");
UserDao userDao = (UserDao) app.getBean("userDao");
userDao.save();
}
}
Spring配置文件
Bean标签
用于配置对象交由 Spring来创建。
默认情况下它调用的是类中的**无参构造函数,**如果没有无参构造函数则不能创建成功。
基本属性
id: Bean实例在 Spring容器中的唯一标识
class: Bean的全限定名称
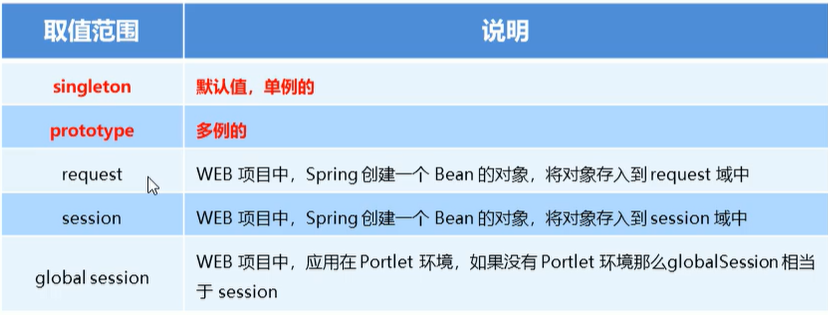
scope:指对象的作用范围,取值如下
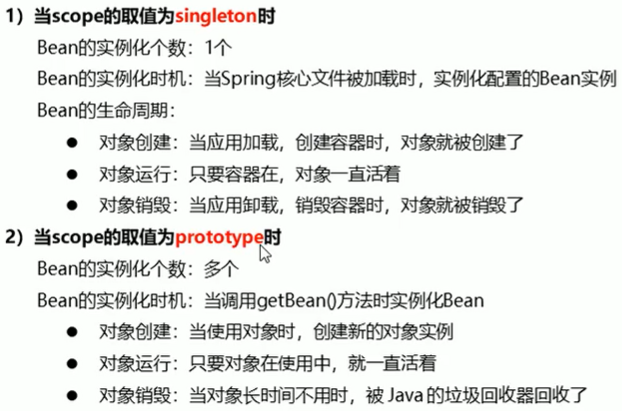
singleton、prototype下bean对象的不同创建时间
singleton、prototype下bean对象的不同创建时间
Bean实例化三种方法
无参构造方法实例化
1
2
3
4
// 创建容器
ApplicationContext app = new ClassPathXmlApplicationContext("applicationContext.xml");
// 从容器中获得对象
UserDao userDao = (UserDao) app.getBean("userDao");工厂静态方法实例化
工厂实例方法实例化
Bean的依赖注入
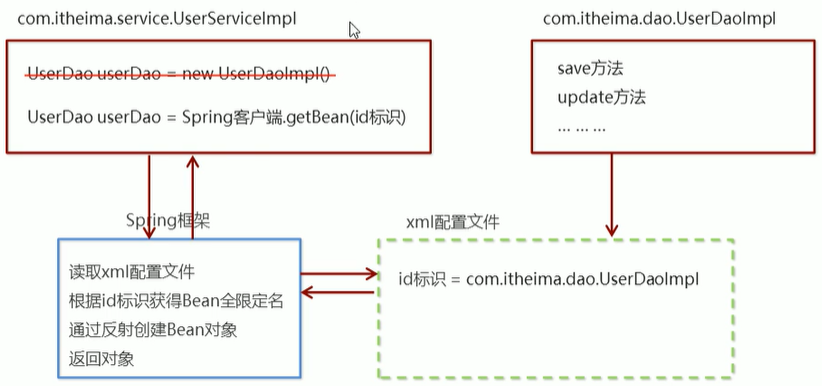
依赖注入( Dependency Injection):它是 Spring框架核心|OC的具体实现
在编写程序时,通过控制反转,把对象的创健建交给了 Spring,但是代码中不可能出现没有依赖的情况。
OC解耦只是降低他们的依赖关系,但不会消除。例如:业务层仍会调用持久层的方法。
那这种业务层和持久层的依赖关系,在使用 Spring之后,就让 Spring来维护了
简单的说,就是坐等框架把持久层对象传入业务层,而不用我们自己去获取。
set方法(property标签)
1 | <!-- 第一种 --> |
1 | // UserServiceImpl中依赖注入,获得userDao对象 |
构造(有参)方法(constructor-arg标签)
1 | <bean id="userService" class="com.myspring.service.impl.UserServiceImpl" > |
1 | // 依赖注入,获得userDao对象 |
注入数据的数据类型
- 普通数据类型
- 引用数据类型
- 集合数据类型
- 演示视频
分模块开发(import标签)
实际开发中, Spring的配置内容非常多,这就导致 Spring配置很繁杂且体积很大,所以,可以将部分配置拆解到其他配置文件中,而在 Spring主配置文件通过impor标签进行加载。
1 | <import resource="applicationContext-user.xml"></import> |
Spring相关API
ApplicationContext
application Context:接口类型,代表应用上下文,可以通过其实例获得 Spring容器中的Bean对象
三种实现类
- ClassPathXmlApplicationContext
它是从类的根路径下加载配置文件推荐使用这种 - FileSystemXmlApplicationContext
它是从磁盘路径上加载配置文件,配置文件可以在磁盘的任意位置。 - AnnotationConfigApplicationContext
当使用注解配置容器对象时,需要使用此类来创建 spring容器。它用来读取注解。
getBean()方法
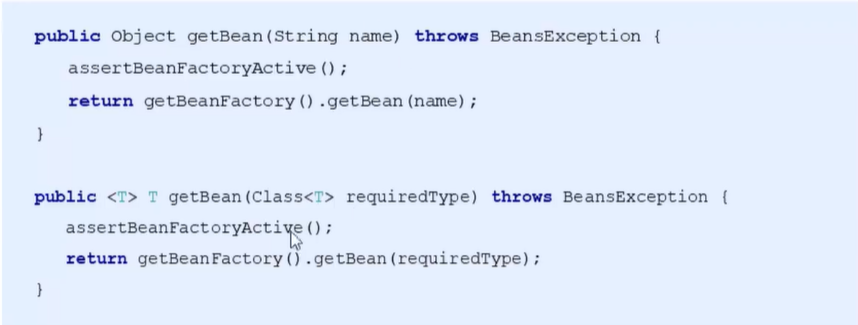
1 | UserService userService1 = (UserService) app.getBean("userService"); |
Spring配置数据源
数据源(连接池)的作用
- 数据源(连接池)是提高程序性能如出现的
- 事先实例化数据源,初始化部分连接资源
- 使用连接资源时从数据源中获取
- 使用完毕后将连接资源归还给数据源
手动创建数据源的开发步骤
导入Maven依赖
1
2
3
4
5
6
7
8
9
10
11
12
13
14
15
16
17<dependency>
<groupId>mysql</groupId>
<artifactId>mysql-connector-java</artifactId>
<version>5.1.46</version>
</dependency>
<dependency>
<groupId>c3p0</groupId>
<artifactId>c3p0</artifactId>
<version>0.9.1.2</version>
</dependency>
<dependency>
<groupId>com.alibaba</groupId>
<artifactId>druid</artifactId>
<version>1.2.6</version>
</dependency>创建jdbc.properties
1
2
3
4=com.mysql.jdbc.Driver
=jdbc:mysql://localhost:3306/数据库名
=root
=123456789加载properties配置文件
1
2
3
4
5ResourceBundle rb = ResourceBundle.getBundle("jdbc");
String driver = rb.getString("jdbc.driver");
String url = rb.getString("jdbc.url");
String username = rb.getString("jdbc.username");
String password = rb.getString("jdbc.password");创建数据源
1
2
3
4
5
6
7// 创建c3p0数据源
ComboPooledDataSource dataSource = new ComboPooledDataSource();
dataSource.setDriverClass(driver);
dataSource.setJdbcUrl(url);
dataSource.setUser(username);
dataSource.setPassword(password);
Connection connection = dataSource.getConnection();1
2
3
4
5
6
7// 创建Druid数据源
DruidDataSource dataSource = new DruidDataSource();
dataSource.setDriverClassName(driver);
dataSource.setUrl(url);
dataSource.setUsername(username);
dataSource.setPassword(password);
DruidPooledConnection connection = dataSource.getConnection();
使用Spring创建数据源的开发步骤
导入相关依赖
在applicationContext中配置数据源bean
1
2
3
4
5
6
7
8
9
10
11
12
13
14
15
16
17
18
19
20
21
22<!-- 引入context命名空间和约束路径 -->
xmlns:context="http://www.springframework.org/schema/context"
xsi:schemaLocation="http://www.springframework.org/schema/beans http://www.springframework.org/schema/beans/spring-beans.xsd http://www.springframework.org/schema/context http://www.springframework.org/schema/context/spring-context.xsd">
<!-- 加载外部的properties文件 -->
<context:property-placeholder location="classpath:jdbc.properties" />
<!-- c3p0 -->
<bean id="dataSource1" class="com.mchange.v2.c3p0.ComboPooledDataSource">
<property name="driverClass" value="${jdbc.driver}"> </property>
<property name="jdbcUrl" value="${jdbc.url}"> </property>
<property name="user" value="${jdbc.username}"> </property>
<property name="password" value="${jdbc.password}"> </property>
</bean>
<!-- Driud -->
<bean id="dataSource2" class="com.alibaba.druid.pool.DruidDataSource">
<property name="driverClassName" value="${jdbc.driver}"> </property>
<property name="url" value="${jdbc.url}"> </property>
<property name="username" value="${jdbc.username}"> </property>
<property name="password" value="${jdbc.password}"> </property>
</bean>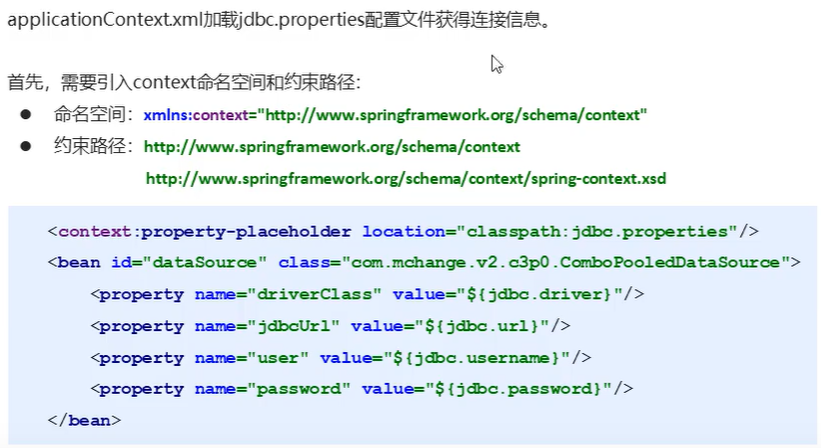
创建数据源对象
1
2
3ApplicationContext applicationContext = new ClassPathXmlApplicationContext("applicationContext.xml");
DataSource dataSource = applicationContext.getBean(DataSource.class);
Connection connection = dataSource.getConnection();
Spring注解开发
Spring原始注解主要是替代
的配置
原始注解

组件扫描
使用注解进行开发时,需要在 applicationContext. xm中配置组件扫描,作用是指定哪个包及其子包下的Bean,需要进行扫描以便识别使用注解配置的类、字段和方法。
1 | <!-- 配置组件扫描 --> |
Dao类
1 | <!-- 配置文件 --> |
1 | // 注解配置,写在类名之上 |
Service类
1 | <!-- 配置文件 --> |
1 | // 注解配置,写在类名之上 |
1 | // 注解配置,写在字段之前 |
普通属性注入
1 |
|
新注解
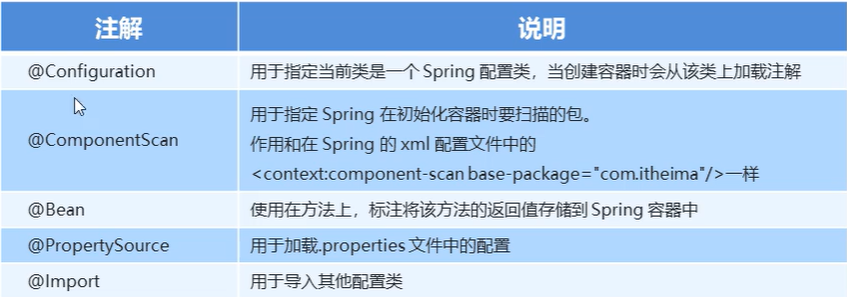
整合在一起的样子,如下:
1 | // 标志该类是Spring的核心配置类 |
分模块如下(推荐):
1 | // 标志该类是Spring的核心配置类 |
1 | // 加载外部的properties文件,替换<context:property-placeholder location="classpath:jdbc.properties"/> |
Spring集成junit
添加依赖
1
2
3
4
5
6
7
8
9
10
11<dependency>
<groupId>junit</groupId>
<artifactId>junit</artifactId>
<version>4.13.1</version>
<scope>test</scope>
</dependency>
<dependency>
<groupId>org.springframework</groupId>
<artifactId>spring-test</artifactId>
<version>5.2.3.RELEASE</version>
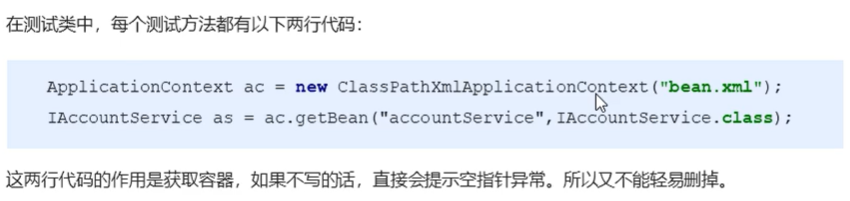
</dependency>编写测试类
1
2
3
4
5
6
7
8
9
10
11
12
// @ContextConfiguration("classpath:applicationContext.xml") // 非注解方式注入配置
// 注解方式注入配置
public class SpringJunitTest {
private UserService userService;
public void test1() {
userService.save();
}
}
Spring集成web环境
应用上下文对象是通过 new ClasspathXmlApplication Context( spring配置文件)方式获取的,但是每次从容器中获得Bean时都要编写 new ClasspathXmlApplication Context( spring配置文件),这样的弊端是配置
文件加载多次,应用上下文对象创建多次。在Web项目中,可以使用 ServletcontextListener监听Web应用的启动,我们可以在Web应用启动时,就加载 Spring的配置文件,创建应用上下文对象 Application Context,在将其存储到最大的域 servletContext域中,这样就可以在任意位置从域中获得应用上下文 Application Context对象了
手动使用listener获取应用上下文对象
创建listener类
1
2
3
4
5
6
7
8
9
10
11
12
13
14
15public class ContextLoaderListener implements ServletContextListener {
public void contextInitialized(ServletContextEvent servletContextEvent) {
// ApplicationContext app = new ClassPathXmlApplicationContext("applicationContext.xml"); //使用非注解时用该方法创建
ApplicationContext app = new AnnotationConfigApplicationContext(SpringConfiguration.class); // 使用注解时用该方法创建
// 将Spring的应用上下文对象存储到ServletContext域对象中
servletContextEvent.getServletContext().setAttribute("app", app);
System.out.println("spring容器创建完毕");
}
public void contextDestroyed(ServletContextEvent servletContextEvent) {
}
}在web.xml中配置listener
1
2
3<listener>
<listener-class>com.myspring.listener.ContextLoaderListener</listener-class>
</listener>获取servletContext域对象中的应用上下文对象
1
ApplicationContext app = (ApplicationContext) this.getServletContext().getAttribute("app");
使用Spring获取应用上下文对象
导入依赖
1
2
3
4
5<dependency>
<groupId>org.springframework</groupId>
<artifactId>spring-web</artifactId>
<version>5.2.8.RELEASE</version>
</dependency>配置web.xml
1
2
3
4
5
6
7
8
9<!-- 设置全局参数 -->
<context-param>
<param-name>contextConfigLocation</param-name>
<param-value>classpath:applicationContext.xml</param-value>
</context-param>
<!-- 配置监听器 -->
<listener>
<listener-class>org.springframework.web.context.ContextLoaderListener</listener-class>
</listener>获取应用上下文对象
1
WebApplicationContext app = WebApplicationContextUtils.getWebApplicationContext(req.getServletContext());
JdbcTemplate
概述
它是 spring框架中提供的个对象,是对原始繁琐的 dbc API对象的简单封装。 spring框架为我们提供了很多的操作模板类。例如:操作关系型数据的 dbcTemplate和 bernate Template,操作nosq数据库的 RedisTemplate,操
作消息队列的 UmsTemplate等等。
手动开发步骤
添加依赖
1
2
3
4
5
6
7
8
9
10
11<dependency>
<groupId>org.springframework</groupId>
<artifactId>spring-jdbc</artifactId>
<version>5.0.4.RELEASE</version>
</dependency>
<dependency>
<groupId>org.springframework</groupId>
<artifactId>spring-tx</artifactId>
<version>5.0.4.RELEASE</version>
</dependency>创建数据库表和javaBean
创建jdbcTemplate对象、执行数据库操作
1
2
3
4
5
6
7
8
9
10
11
12
13
14
15
16public class JdbcTemplateTest {
// 测试dbcTemplate开发步骤
public void test() {
// 创建Druid数据源
DruidDataSource dataSource = new DruidDataSource();
dataSource.setDriverClassName("com.mysql.jdbc.Driver");
dataSource.setUrl("jdbc:mysql://localhost:3306/test");
dataSource.setUsername("root");
dataSource.setPassword("123456789");
// 创建jdbcTemplate对象
JdbcTemplate jdbcTemplate = new JdbcTemplate(dataSource);
// 数据库操作
jdbcTemplate.update("insert into test1 values(?,?)", "张三", 18);
}
}
Spring使用JdbcTemplate开发步骤
添加依赖
编写jdbc.properties文件
编写spring-config文件applicationContext.xml,添加数据源对象,jdbcTemplate对象
1
2
3
4
5
6
7
8
9
10
11
12
13
14
15
16
17
18
19<!-- 引入context命名空间和约束路径 -->
xmlns:context="http://www.springframework.org/schema/context"
xsi:schemaLocation="http://www.springframework.org/schema/beans http://www.springframework.org/schema/beans/spring-beans.xsd http://www.springframework.org/schema/context http://www.springframework.org/schema/context/spring-context.xsd">
<!-- 加载外部的properties文件 -->
<context:property-placeholder location="classpath:jdbc.properties"/>
<!-- Druid DataSource -->
<bean id="dataSource" class="com.alibaba.druid.pool.DruidDataSource">
<property name="driverClassName" value="${jdbc.driver}"/>
<property name="url" value="${jdbc.url}"/>
<property name="username" value="${jdbc.username}"/>
<property name="password" value="${jdbc.password}"/>
</bean>
<!-- Spring JdbcTemplate -->
<bean id="jdbcTemplate" class="org.springframework.jdbc.core.JdbcTemplate">
<property name="dataSource" ref="dataSource"/>
</bean>编写代码
1
2
3
4
5
6// 获得applicationContext
ApplicationContext app = new ClassPathXmlApplicationContext("applicationContext.xml");
// 从容器中获得jdbcTemplate对象
JdbcTemplate jdbcTemplate = app.getBean(JdbcTemplate.class);
// 数据库操作
jdbcTemplate.update("insert into test1 values(?,?)", "张三", 18);
常用操作
1 | jdbcTemplate.update("update test1 set age=? where name =?", 10, "张三"); |
AOP
概述
AOP为 Aspect Oriented Programming的缩写,意思为面向切面编程,是通过预编译方式和运行期动态代理现程序功能的同统一维护的一种技术。
AOP是OOP的延续,是软件开发中的一个热点,也是 Spring框架中的个重要内容,是函数式编程的种衍生范型。利用AOP可以对业务逻辑的各个部分进行隔离,从而使得业务逻辑各部分之间的耦合度降低,提高程序的可重用性,同时提高了开发的效率。
作用与优势
黑马程序员最全SSM框架教程|Spring+SpringMVC+MyBatis全覆盖_SSM整合_哔哩哔哩_bilibili
JDK动态代理、cglib动态代理
黑马程序员最全SSM框架教程|Spring+SpringMVC+MyBatis全覆盖_SSM整合_哔哩哔哩_bilibili
概念
- Target(目标对象):代理的目标对象。
- Proxy(代理):—个类被AOP织入增强后,就产生一个结果代理类。
- Joinpoint(连接点):所谓连接点是指那些被拦截到的点。在 spring中这些点指的是方法,因为 spring只支持方法类型的连接点。
- Pointcut(切入点):所谓切入点是指我们要对哪些 Joinpoint迸行拦截的定义。
- Advice(通知/增强):所谓通知是指拦截到 Joinpoint之后所要做的事情就是通知。
- Aspect(切面):是切入点和通知(引介个)的结合。
- eaving(织入):是指把增强应用到目标对象来创建新的代理对象的过程。spring釆用动态代理织入,而Aspect采用编译期织入和类装载期织入。
基于XML开发AOP
步骤
导入依赖
1
2
3
4
5
6
7
8
9
10
11
12
13
14
15<dependency>
<groupId>org.springframework</groupId>
<artifactId>spring-context</artifactId>
<version>5.2.8.RELEASE</version>
</dependency>
<dependency>
<groupId>org.springframework</groupId>
<artifactId>spring-aop</artifactId>
<version>5.2.8.RELEASE</version>
</dependency>
<dependency>
<groupId>org.aspectj</groupId>
<artifactId>aspectjweaver</artifactId>
<version>1.9.7</version>
</dependency>创建目标接口和目标类

创建切面类(含增强方法)
1
2
3
4
5
6
7
8
9
10
11
12public class MyAspect {
public void before() {
System.out.println("前置增强。。。");
}
public Object around(ProceedingJoinPoint pjp) throws Throwable {
System.out.println("前置增强。。。");
Object proceed = pjp.proceed();
System.out.println("后置增强。。。");
return proceed;
}
}配置applicationContext.xml
1
2
3
4
5
6
7
8
9
10
11
12
13
14
15
16xmlns:aop="http://www.springframework.org/schema/aop"
http://www.springframework.org/schema/aop http://www.springframework.org/schema/aop/spring-aop.xsd
<!-- 目标对象 -->
<bean id="target" class="com.myspring.aop.Target"/>
<!-- 切面对象 -->
<bean id="myAspect" class="com.myspring.aop.MyAspect"/>
<!-- 配置织入,即哪些方法需要哪些增强(前置后置增强等) -->
<aop:config>
<!-- 声明切面 -->
<aop:aspect ref="myAspect">
<!-- 切点+通知(增强) -->
<aop:before method="before" pointcut="execution(* com.myspring.aop.*.*(..))"></aop:before>
<aop:around method="around" pointcut="execution(* com.myspring.aop.*.*(..))"/>
</aop:aspect>
</aop:config>测试
1
2
3
4
5
6
7
8
9
10
11
// 非注解方式注入配置
public class SpringJunitTest {
private TargetInterface target;
public void test1() {
target.save();
}
}
切点表达式

1 | <aop:config> |
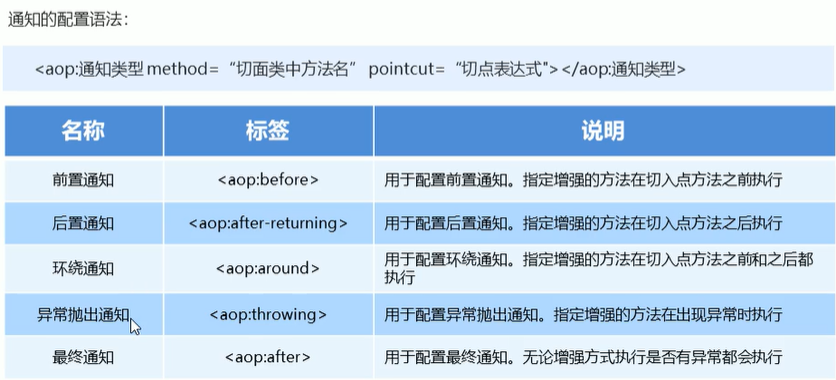
通知类型
基于注解开发AOP
目标类、切面类
配置目标类、切面类
1
2
3
4
public class Target implements TargetInterface {
}1
2
3
4
5
6
7
8
//标注当前是一个切面类
public class MyAspect {
public void before() {
System.out.println("前置增强。。。");
}
}配置applicationContext.xml
1
2
3
4<!-- 注解开发组件扫描 -->
<context:component-scan base-package="com.myspring.aop"/>
<!-- aop自动代理 -->
<aop:aspectj-autoproxy/>
切点表达式抽取
1 |
|
事务控制
黑马程序员最全SSM框架教程|Spring+SpringMVC+MyBatis全覆盖_SSM整合_哔哩哔哩_bilibili